Thursday 28 December 2023

The 3 chess rooks: Pseudo jasperware urn and pedestal


Hello my friends.

Christmas was a few days ago and I hope that you have all spent those days enjoying yourselves with good company, good food and good cheer! I found some time around the festivities to work a bit on my many half finished ptojects. I started this "Jasperware" style urn back in June, but only this week it was ready to show it to you. 

In april 2023 in the post 'A Rook's Chessmate?' I showed you how I changed 2 rooks out of a small collection of second hand/damaged chess pieces into two pedestals for statuary. Each with its own style and decor.


That meant that one rook, the smallest of the bunch, was still waiting to be transformed. But what to do with it? Because of it's shape, and because I have only one of this size, the choices are somewhat limited. It can't be much more than a (part of a) pedestal or perhaps a decorative chimney pot? that is about it, I think. Alison's Marie Antoinette bust that I gave a faux terracotta finish looked good on the ebonised wood. But, nice as it was, it was jusy more of the same. A bit "meh", if you know what I mean. 


So it should be something else than another bust or statue. It became a vase. I had a resin urn with roman figures which had too many coats of paint on it so the reliefs were hardly visible, let alone decipherable. It lay in my stash waiting to be used for something. Inspired by some examples of Jasperware I wanted to try and give it that powdery matte Wedgewood look. 

First I used water and a toothbrush to remove most of the thick layer of paint. Next I tested what the finish would be if I used the porcelain paint pens I bought back in 2016 and haven't used since I decorated the egg cup garden urns that year. I quite like the blue although it is a hard colour clue. It fit's quite well with the Jasperware theme. I would love to have it a shade or two lighter, but I decided to go with it.


The porcelain paint in these pens are meant to be kaked in the oven. But when you let it dry in the air it sticks well to the surface of the object. And another advantage is that this paint dries up in a very matte finish when you not bake it in the oven. and since Jasperware is not glazed, that is exactly the finish I need. 

Even without baking it, it dries up hard and is rub resistant. So after covering urn and rook in 3 or 4 layers of ink with the marker it was time to think up some fitting decorations in the classical style Wedgewood is known for.


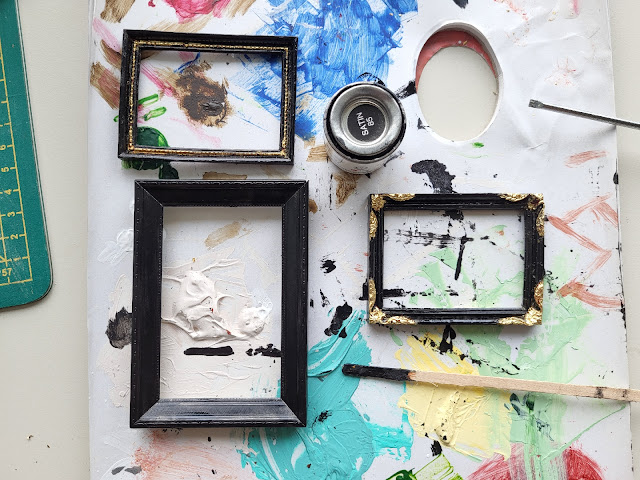
And these two drawings are what I came up with. To let the white decorations match with the blue I did not use paint and brushes. The lines should be sharp. So I brought out some white artists fineliners and scribbled away. After the first tries I got something like you see in the picture beneath. The vase is not quite ready and the pedestal only has the greek scroll penned on, but I quite like how this is coming together.

Since we are halfway decorating the pedestal and urn it was high time to decide if I would fill it. And if so, with what? I can leave it empty ofcourse, or make a lid to close it off. But in the end I decided that I want to fill it with something. 

Flowers were suggested by some of you in the previous post. I quite like the idea. However roses or mixed flowers somehow just do not seem right for this type of vase. But what else? I turned my attention to fruits and nuts...

Since it is december, a type of christmas decoration is not unlikely. Citrus fruits were very popular in these parts of the world around Christmas and assoiated with december. Inspired by the post of Jonquil in her blog ( Latchkey & Jonquil) about pomanders or pomme dámbre, I got out the fimo clay and started making lemons, oranges, and tangerines using her excelent instructions in her post. 

I also wanted to make pomanders, but I had no time to finish those. So the orange balls I had prepared for those were kneeded back into one big ball and stored in a plastic bag. Hopefully I'l find time to work on those in the coming weekend!


Around 1806 the use of Christmas trees was slowly, very slowly becoming fashionable in the Netherlands. Much later than for example in parts of Germany and England. What was fashionable already, was to use fruits and nuts and berries to decorate the houses of the well to do. Towers of fruits and nuts or confectionary were already used to decorate houses since the early 17th century. 

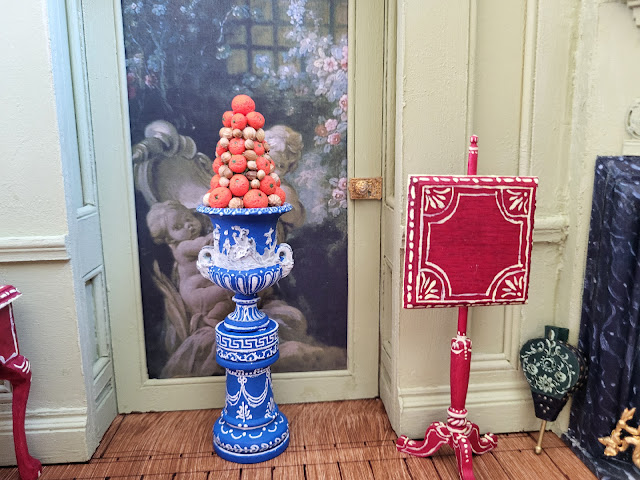
So my plan is to use some of the tangerines to make a piramidal display to decorate for the holidays. As nuts I used koriander seeds or cilantro seeds. I used some residual clay pieces to make a base and stuck on the tangerines and seeds to form a decorative ensemble. It was trickier than I had imagined it would be, but I got there in the end. 
But finaly it all came together to form this ensemble. Do you like it? I do. It was quite a lot of work to make this. The pens are very time consuming for this type of finish. So I will not make a huge collection of faux Jasperware, but I will probably make another faux Jasperware piece sooner or later...

Unfortunately, you can see the black of the resin shining through in pleces on hte urn. That is where the original pain on the urn has rubbed off while I handled it decorating it and filling it with the fruit and nuts. I will repaint that as soon as possible together with some other retouches here and there, but for now I call it finished!

If I do not find a time to post again before 2024 I want to take the opportunity to wish you all a very happe Newyear! may 2024 bring you all joy and good health!

Huibrecht


Friday 1 December 2023

An arrogant man...


Hello my friends,

I promised that my next post would be the finished dressing room of lady Anne Belle Zonneschut. But this little post comes in between.

One of the little treasures I bought in Arnhem was not included in my october post on the DHN show of 2024. But it is here now. The reason for that is that when I found it, I only had enough cash left to make a downpayment. Last week the artist and I met in Arnhem and exchanged the painting for me paying the remainder of the price.

This  portrait is painted by Jaap Wijtenburg, who paints large and small paintings and portraits. And he also makes the frames for the miniature ones by hand. This frame is made of wood with details in sculpy or such material to turn it into a proper 18th century picture frame.

Now when I saw this watercolour of a late 18th century gentleman in a silk house robe I was immediately smitten! For surely that is a portrait of none other than Carel Polyander Zonneschut?

It is not a copy of an existing portrait, but Jaap's own composition inspires by different portraits of that age. He told me frankly, that he does not find the man very sympathetic. He actualy titled this portrait "the nasty man". This because the man looks arrogant and selfcentered. I actualy think that he looks a bit bashful. 

 Arrogant or not, I fell in love with this portrait the moment I saw it! It is a water colour with added pastels to give it the appearance of a portrait in pastels. Drawing with pastels was a favorite hobby for noble and well to do ladies in the 18th century. And often portraits of friends and family were made. 

So I like to think that Anna Belle made this portrait of Carel Polyander at their leasure on some sunny afternoon, before the advent of the revolutions of the latter quart of that century.... 

Huibrecht


Thursday 23 November 2023

Dressing room: odds and ends.


Hello my friends, 

This is already the fourth post in November. I am certainly catching up on lost time/posts, of the last few months. :-)

This post is a collection of some of the remaining miniatures I still needed to do to finish the dressing room of Belle Zonneschut. In this older picture of the room I have encircled them all in red. Naturally there is always room for more, but after these last bits and pieces I will call this room finished for now and start work in earnest on the Steward's office in the basement of the house. 

Why do these last little chores take so long to pick up and finish? O really can't say. Oh well, I have taken them on now. The first little chore was to finally varnish the painted wooden floor. I used a matte varnish because it should not shine like a parquet floor. The main reason for varnishing ofcourse is to protect the paint from scratching due to moving around furniture or the walls of the room. 

So what else still needed doing?

The stool for the little wig room:

Like the painted table this stool kit is an old House of Miniatures kit I found on the internet. I rounded off the square cut legs and the corners of the seat to make it fit better to the rounded corners and legs of the table. Next I mixed Hooker's green and titanium white until I got the same light green shade I used on the table and painted the stool with it. It took a few trials of adding a little more green, or a little more white but I finally found the exact tint of green! 

The foam seat that came with the kit was quite stiff and somewhat brittle (perhaps due to the age of the kit) and it would not budge under the tightening of the fabric. So to get rounded corners I used a file to get rid of the sharp edges before applying the fabric. The light green fabric is said to be silk but I am not sure if it is real silk. It can be formed when wet so perhaps it is the real deal, but it looks synthetic to me. Synthetic or not, the colour goes very well with the green paint.


When the base coat of paint had dried, I added the decorations in unmixed Hookers's green and titanium white next. And finaly the result of the paintjob can be seen above. 

The dressing room curtain:

Here the curtain looks a bit sad, but when I am finished it will look better. I used a piece of the same (synthetic/ silk) fabric I upholstered the green stool with, as a curtain. I made it wet and pushed it in a pretty pleater mat.  A pair of Alison Davies doorknobs and a bamboo skewer (all painted gold) for the curtain pole. I've wetted the pleated fabric again a little and tried to drape it over the pole. As you can see it needs some tweeking, still, but this is the curtain I am going with for now.

To make it look a bit better I made a few tassels out of saffron coloured embroidery silk. I hung them on both ends of the pole on different lengths of cord and added some decorative loops of cord before glueing the ends of the cords in place. I glued the ends on the back of the skewer. the rest rests on the curtain or hangs free. This way I can rearrange them if I like to.  I guite like the curtain with the loops and tassels. It gives this room a different appearance than the bare window did.


The wig room mirror:

For this mirror I backed a beautiful brass stamped frame with mirror foil after I had "silvered" it with leaf metal. When that was done I hung it on the wall on a cut off dressing pin stuck in the wood. To disguise the pin I threaded a green piece of satin ribbon  to make it crinkle. I followed the tutorial in an old Dollshouse Nederland magazine (1997). The tutorial is inspired by the way paintings in Paleis het Loo were hung in the 17th and 18th century.

I fastened it onto the ring on top of the mirror and attached the other end at the top of the pink wall. The bottom end is decorated with a little rozette, crinkled the same way but this time threading not in the middle of the ribbon but to one side. The top end of the ribbon is decorated with a small green glass bead. It surprises me how much more light this frame picks up now that it is silvered, compared to the pretty but dull original colour of the brass.

I have also silvered the brass frame for te standing mirror on the table with the hats.  you can see it in its unsilvered state in the top photo. I have already shown you the result of that mirror in my post a few weeks ago. So I will not repeat that here. You will see it again soon when I have refurnished the completed room that I will show you next week.

The framed silhouettes:

I want to hang two framed silhouettes on the back wall of the dressing room. The small strip to the right of the door leading into the powdering room is too narrow to add panels but too wide to leave bare. There is not much that can go there though. These inexpensive resin frames came from 'Action' a cheap store over here with all and sundry at bargain prices. The 'gold' colour is appaling. Nothing like the real stuff, so I gilded them using gold leaf on aplied on gold size.

 I have studied several silhouettes. and what I like about the 18th century ones, is that many of those are not just filled in with black ink showing just the silhouette of the person that posed for it. No, in the late 18th century they added several highlights to make the depichted person more recognisable. Somethimes even going so far as to colour the clothes they wore in red or blue or whatever colour to decorate them further. I drew several silhouettes leaving out the wigs, cravattes and such off ink to evoke the look and feel of late 18th century silhouettesl Of the four you see above I chose the lady and the gentleman to go into the small oval frames. 

When the gilded frames were cleaned up I stuck the two small silhouettes in the two oval frames and hung them on the dressing room wall next to the door to the wig room. This way the narrow strip of wall has some decoration and is no longer bare. Like I said, it simply was too wide to do nothing with it. These silhouettes could be family members or friends that are dear to Belle's heart. 


The other two silhouettes in round frames, an abbot and an officer, will find another place in another room. but that is a subject for another post.

The framed Jonquil embroidery:

This is the beautiful and fine stitchwork of Jonquil which she gave as a present. The photo does not do it justices since it is a little blurred. It is a little work of art with 1722 as a date. And she even has worked my initials HD into it. I feel that it is something prized by Belle Zonneschut. IN 1806 the embroidery already has an age of 83 years. It could be made by a treasured ancestor. And that is why she wants to keep it close to her in the private rooms of her appartment in Huis ter Swinnendael. 

So what is needed now, is nail in the wall. Because of the pinks and reds in the embroidery I want it on the wall of the little wig room. And because most of this little room is obscured from view due to the wall and the open door it needs to hang on a spot where it can be seen by anyone viewing this miniature room. I turned the room on its back to hammer a short nail into the woodwork. I am so glad that the walls section is not yet glued to the floor yet! Or to the ceiling for that matter. That would have made that much more difficult. The open door between the two rooms is xixed already and that made this little task already difficult enough.

Foto

Apart from that door it was a simple enough task and went without a hitch. Finally this beautiful gift is hanging on a wall for every visitor to see. 

Window seat cushions:

My first venture into the world of sewing and fabrics was this long flat cushion fo the windowseat. The yellow cotton contrasts nicely with the red trim and tassles. But this cusion on its own still makes the windowseat look somewhat bare. And it turned out a bit shorter than intended, so it leaves a bit of a gap left and right. I quite like bolster cushions, so why not make one or two for the windwow seat to dress it up a bit?

To make the bolsters I used the same method as for the one I made for the daybed. I simply cut off two lengths of dowel and rounded off the corners. I made two small red tassels to match the ones on the flat cushion. With th use of a needle I threaded them through two pieces of fabric that go on the short sides of the bolster. I then glued on these bits and cut off the excess. I cut two pieces of yellow cotton to cover the long side and folded over the edges to get a neat edge. I fixed it with glue. 

After I glued the fabric on and the glue had dried I added some picquot trim in the same red colour as the tassles for decoration. Et voila!

The stool for the dressing table: 

What can I say? The dressingtable also needs a stool. The dressingtable is a second hand. the previous owner had it stripped from its paint or lacquer. The natural wood colour is pretty but in the 18th century simply was not done. It needed a stain at least. Or a paintjob. But with so many painted furniture in the room already I prefer a bit more natural wood for contrast. 

I have a bottle of 'antique oak' stain. I applied two coats of it onto the secretaire and on a little unpainted stool. It gives very little colour but it gives the wood a treated look. I quite like that. unfortunately at the same time it does not really hide the different colours in the natural wood. So it does not really unify the pieces together. I leave that for now.

I made a padded seating for this stool using the same green silk as I used on the daybed. It looks a bit plain. So to add some variety and to try out a new technique (for me at least) I added buttons using the tutorial shown by Jodi on her blog "Miniature Madness". You can find it in the post "Waylaid by faith"

I marked out the position of the buttons on the back of the padded seat and wanted touse the smallest brass coloured beads I could find in my stash. these woul be the buttons but they were so small that the needle would go through their holes. So I abandoned the buttons idea and just used the thread. After some trial and error I ended up with the result as you can see in the picture above. And with that I am very close to calling this miniature room finished. (Miniature rooms are never finished ofcourse, but this one is for now.)

Next week I'll show you the pictures of the finished dressingroom and wig powdering room in all its glory! 

Huibrecht


Saturday 18 November 2023

Be careful with the Midas touch...


Hello my friends. 

I have collected a few frames for miniature paintings over the years and on a wet and sulky saturday I decided to try and gild them. The frames you see in the top picture are all resin or plastic frames of different makers and sources. 


The picture above shows you the difference between the 'gold' colour these cheap little frames came with from the factory, and the colour and lustre of metal gold leaf. I love the colour of gold on these frames. 


In the picture above and below you can see the gilding in progress. The plastic frame of my Maria the Medici portrait is first cleaned. than covered in gold sise. Gold sise is a kind of glue based on bole clay that dries up sticky. the metal leaf (gold, silver etc.) sticks very well to it. And below you can see the end result. Although this young lady will get a totally different frame eventualy. 


And that got most of the frames covered in a layer of gold leaf . Now all I have to do is find the right pictures, resize them where necessary and give them a multi layer varnish treatment to make them look more like paintings like I did with the portrait of Liliane Zonneschut. Here I go into the gilding process in more detail. 


But not all frames should be gilded! in the 17th century black ebony or ebonised wood was highly prised for picture frames. And a house like Huis ter Swinnendael contains several pictures from that century too. The Zonneschut's have always been collectors of art since they had amassed their wealth and needed to show they were cultured people. 

That is what I mean in the title of this post by being careful with the midas Touch! So out came the black paint and those thrames which fit the style got a treatment with the brush. This does mean that two gilded frames got painted over, but I left some gold showing to enhance the look. 


As you can see above gold shimmers through the black paint here and there where it is not suposed to. So a second layer was requiered. Then it was time to fill the frames. It would be super to only have hand painted miniatures hanging on the walls, but that is waaaaay out of budget zone. Although I slowly collect miniature paintings, most frames will be filled with prints. I have collected many many pictures for this project. Most of these will never be used, but they are great to sift through and collect paintings or portraits that I want to hang in Huis ter Swinnendael. 


But not all will be filled with prints. Using 18th silhouettes as a guide I have drawn a few on cream coloured paper. This worked better than expected and I ended up with four silhouettes that were just right to be used for decorating Huis ter Swinnendael. 


Then it was time to cut out pieces of 2 mm thick, stiff cardboard for backing up the thin and flimsy prints. I had a long and narrow strip cut off lying around which fits these frames perfectly! Right down to the last millimeter it fits the long or short side of five of the seven picture frames. Only the small frame with the broody looking young man needed an extra cut to fit. The largest frame, holding a painting of Artemis looking at her hound, was glued right o to the glass plate belonging to this old little photo frame. 


Soon all the cardboard back were cut to size and now it was it was time to cut the prints of the paintings to size. As you can see this small collection of paintings is a mix of subjects.

Two very different nudes. Artemis is a mythological subject ofcourse. The naked reclining man however is a biblical subject. It depicts Jacob's dream. Old testament Jacob is sleeping and he dreams about angels climbing up and descending a long ladder between heaven and earth. In the painting this can be seen in the background to the left. .

And apart from that, there is a pair of early 18th century gentlemen. Two brothers that are portrayed by the same french painter. Uncles of Carel Polyander probably. In the two black frames with golden decorations there are two still lifes with porcelain food and persian rugs. Not by the same painter but they match quite nicely.

The frame that came off of the portrait of Maria de Medici now houses an Italian painting of either a young man or Cupid with his bow. He's peering broody out of his frame and the bowstring hangs slack. What coulf  that mean? That his loveis spent? Or he missed his aim? Don't know. It keeps me guessing and that is partly why I chose to enclose this picture in this eclectic lot. 

They are not intended to go onto one wall together. But they would fit as one group though. If the two roundels with silhouettes were replaced by a small painting in a ebonised frame, the group would fit together better. It was however time for the next step in the proces. Varnishing! I varnished the prints of these painings in the same manner I did with Liliane Zonneschut. The varnish does not alter the colours of the print ofcourse, but it does change the way they reflect the light. 

If you look at the above picture with the paintings in their respective frames, and the picture above that, (where the prints lay on top of the frames and the card board backing) you can see what I mean. The lighting in both pictures is different, but that is not what I mean. For example the backgrounds of the 2 portraits and on the two larger still lifes, look darker simply because the layer of varnish changed the way liht is reflected on the surface. I am happy with this change because to me their look is improved.

First a thin even coat of varnish was applied to seal the print off. When that had dried I applied a thicker layer of glossy varnish tapping and swirling with the brush to get a slightly uneven effect to mimic multiple layers of paint varnish and make it look less like an even print and more like an old oil painting with multiple layers of paint and varnish. Because it is a clear and high gloss varnish, you look straight through it when standing in front of it. You only see the dappled effect when the light is reflected off it. Like you can see with the painting of Diana the huntress. 

And there we have it. A small collection of different paintings and portraits brought together and framed in black and/or gold frames in different styles and from different era's. And even a few self drawn silhouettes. I am quite happy with the result. This is it for now. Untill the next post. 

Huibrecht


Monday 13 November 2023

Visiting Grand Houses: Paleis Noordeinde


Hello my friends,

In june I showed you some pictures of Paleis het Loo near the city of Apeldoorn. Which has been the summer residence for many of the stadhouders and kings of the Netherlands well into the 20th century.

And where there is a summer palace, there is also a winter palace.

The royal winter residence (since the restauration of the House of Oranje in 1813) was Paleis Noordeinde in The Hague. Since queen Beatrix ascended the throne in 1980 Paleis Noordeinde is in use as the 'work' palace since 1984. In effect it is the office of the reigning monarch while they live in "Paleis Huis ten Bosch" on the other side of the city.


The Noordeinde palace consists (mainly) of two parts. The old  building you see above. And the 19th century part which you see below. The 17th century building was erected on the site of an older building by Prince Frederik Hendrik in 1643. 

In 1813, after the fall of Napoleon, Prince Willem returned to the Netherlands, where he was proclaimed Sovereign Prince and a year later King of the Netherlands. The expansions to turn it into a royal residence began in 1814. They involved the large wings at the back of the 1643 building you can see in the picture below. From the air it looks a bit like two different palaces standing back to back. 

The Constitution of 1814, turning the prince into a sovereign king, decreed that the State must provide a summer and a winter home for the monarch. Initially there were plans to build a new winter residence, but in the end it was decided to make extensive alterations to the "Oude Hof" as the palace had been called since the 17th century. And since the extension the name of the building changed from Oude Hof into Paleis Noordeinde.


The visit started in the forecourt of the old classicist building. After our tickets, bags and coats were checked we entered the forecourt and enter the palace by its main front entrance. Because this palace is more or less the office of the monarch this entrance is mainly used on certain occasions like when the king opens the parliamentary year or when new ambassadors come to offer their credentials when taking up their post in The Hague.


I forgot to take pictures of the two successive entrance halls which were quite imposing with a lot of marble and raised stucco and furnished with ornate malachite tables. But I did make pictures of all the busts of all the stadhouders since Willem de zwijger up to Willem V. Adorning the hall of the grand staircase as an ancestral gallery. But rest assured, I am not going to show you all 10 of these. 

I show you only two of these busts. Willem III, internationaly better known as king William (King Billy) of William & Mary who ruled great Britain after the Glorious Revolution in 1688. During his reign Huis ter Swinnendael was rebuilt back in 1675. In the history I have written for the house and family, the troops of Louis XIV burn down the old Renaissance style Huize ter Swinnendaele in 1672. That year called het Rampjaar (disaster year, Annus Horribilis) the Dutch Republic was attracked from four sides but survived somehow. The southern part was invaded by France and many great houses were burnt to the ground. Only to be rebuilt in the new fashionable arhitecture of Dutch Classicism. So this koning stadhouder Willem III plays a role in the fictitious history of Zonneschut family.

And the second bust is Willem V. The last of the Stadhouders before the title 
9and. He plays a role ofcourse in the permanent voluntary excile of the Carel Polyander and Anna Belle to their summer retreat. First Carel Polyander was stripped of his diplomatic post in Paris as the first secretary to the embassy due to his sons revolutionary actions in the surpressed Batavian Revolt in 1787. because of his sons fraternising with the revolutionary regime in Paris, he is banished from the Princs's court. And when in 1795 Willem V flees to England he 'flees' from The Hague to the new Huis ter Swinnendael his grandfather built in 1675. To mock and mope the days away in a luxurious exile. 

But that is enough of Zonneschut family history. let's get back to the palace!

This room fully clad in tropical hardwoods is called the Indische Zaal (East Indies Room). To celebrate the marriage of Queen Wilhelmina and Prince Henry in 1901, the government of the then Dutch East Indies decided to give the couple a rather unusual wedding present: an East Indies Room for Noordeinde Palace. Two existing rooms on the ground floor were knocked through to make space for the exotic gift. To produce its individual wooden elements, more a thousand of them in all, woodcutters from all over the Indonesian archipelago were brought its capital, Batavia. The teak panelling features traditional Javenese Hindu and Buddhist motifs as well as contemporary Javanese carvings. The showcases contain gifts presented to members of the royal family by Indonesian royalty over the years.

This red salon is called the Rear reception Room (it ovelrooks the gardens in the back) unfortunaltely the grand front receptionroom was not open to us as visitors. Over the years, what is now the Rear Reception Room has had a variety of functions. In the early nineteenth century it was known as the Marshal’s Dining Room, but King William III had it converted into a library soon after his investiture in 1849. Some time after 1898 it became a silver safe. Today it is used for small formal receptions and is also placed at the disposal of dignitaries staying in the palace’s adjacent guest wing. that wing was also closed to us unfortunately.


Directly above the red salon, on the 'piano nobile,' where all the staterooms are located, we find this diningroom. it is called the Marot room since it is decorated in the Marot style. albeit the 19th century version of it. I was told that on working days King Willem Alexander and the senior staff lunch here. I think this is the swankiest canteen in the Netherlands. :-)

If that story of a fellow visitor is not true, than it is still a marvelous diningroom. I would not mind having a dinner heer. Now where is my tux?

The Putti Room was originally designed for Queen Sophie in the mid nineteenth century. it's most striking feature are the silk wall hangings with putty and flourishes woven into it. It is now used by King Willem-Alexander and Queen Máxima for their weekly meeting with senior palace officials. You could call it the board room of the work palace. :-)


These three photo's are od the grand ballroom slap bang in the middle of the Corps the Logies. It has state rooms on all four sides which means that it has no windows into its walls. The only windows in this room are on the short ends of the varrel vaulted ceiling. In the picture above it is largely obscured by the large chandelier. For a room that is exclusively used in the evenings or night this is not a problem. But for a visit during the daytime all the chandelers need to be lit. 


The stucco decorations and the Empire style of this room may remenisce you of the Pavilion Zu Wied I showed you earlier this year. And if so than you are right. Here the sea horses are griffins and the corals and shells are replaced by acanthus scrolls and rosettes, but the decor dates from the smae period and are in the same style. Although this grand ballroom is way more luxuriously decorated than the salon of the pavilion. How many grand dinners, balls and receptions have been held in this magnificent room? 


On both sides of the ballroom are square antechambers decorated in the same style and with the same colourscheme as the ballroom. My house in its entirety would easily fit a few times in these three rooms... And it is certainly not the larges ballroomin Europe. Not by far. But impressive none the less.


What is now the Green Antechamber was originally red according to the information on the stand. I think I preferr green. The most striking detail in this room is the marble mantelpiece with the monogram “W” (for King William I) and the national coat of arms. This fireplace may be one originally supplied by Lefebvre in 1817 for a throne room which was never built. So you see, it is good to hang onto miniatures you can not use as intended. There is often a good alternative use or location to be found.  :-)


At just over 24 metres, the Gallery is the second-longest room in Noordeinde Palace. It is used regularly for formal dinners. Along the rear wall, opposite the windows, hang five large portraits painted by Jean-Baptiste van der Hulst between 1830 and 1836. Originally intended for the Brussels palace of the Prince of Orange (the later King William III), they depict the children, two daughters-in-law and a granddaughter of King William I.


The Balcony Room is often used by the King on Wednesday mornings, when newly appointed ambassadors present their credentials. Just like in the green room several W's  are to be gound on the plaster ceiling. although they do not show up very clearly in my picture. As the name suggests, this room opens onto the balcony where the royal family traditionally makes an appearance after the annual King’s Speech to Parliament. this you can see in the picture below. naturally we could not go onto the balcony, but oh, how I would have loved to do so. 


And soon after the balcony room it was already time to leave the palace by the small grand staircase. Although only a small portion of the palace is open to visitors I greatly enjoyed visiting this in between the existing streets and buildings of this part of old The Hague. One look back up into the stairwell and a little later we were back in the forecourt, collecting our bags and umbrella's. It was time for to find a good place to order a (royal) lunch!

Huibrecht