Showing posts with label workshop. Show all posts

Saturday, 10 June 2023

Painting porcelain. A charming prince on a white horse! I mean a Unicorn...


Hello my friends,

 It was again time for another lovely workshop painting miniature porcelain. On the first weekend of june our usual group got together to work on our miniature projects. 

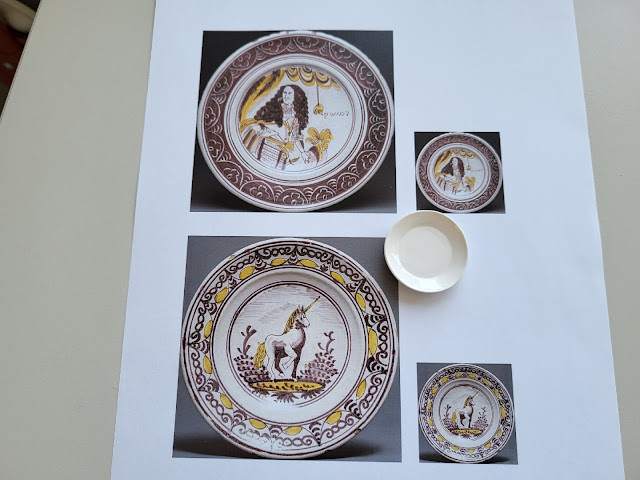
After all the tile tableaux that I made last year it was high time for making a few plates again. Miniature copies of two Dutch majolica plates from the 17th century. 

And something that is very unlike me, their decoration consists of brown and yellow. A colour combination I really do not like. But, I love the decorations on these plates and want make them resemble their originals as closely as I can. So, combining brown and yellow it is!

What I like about the originals is that the plate depicting prince William III, has a design I have never seen before of William III. The composition with the draped curtains and the  plumed helmet echoes the tile tablaux of prince Maurits & prince Frederik-Hendrik (both his great uncles) I made last year. 

Just as rare is the acronym PW3 which stands for 'Prince William the third'. Most plates depicting this William have KW3 (King William the third) or WR (William Rex). Those plates are made after the Glorious Revolution (1688) when the protestant William & Mary took over the English throne from her father King James.

So first we cut out a picture of the plates to size. Colours the back with pencil and stick it onto a plate.(2nd picture) Then we trace the basic lines with a pen to transfer them onto the plate. (2nd picture)

The next step is retracing the lines with porcelain ink. And add some of the decorations on the rim. (3d picture) when the ink has dried we fill in the colour with porcelain paint. First brown then yellow. One peculiarity of the Prince William III plate is that the decorative rim is not decorated by adding paint, like with the unicorn plate, but by scratching lines into the dried paint.  Thus revealing the white porcelain underneath. I tried a needle for this but that sadly would not work. A wooden toothpick did do the job. This made lines that actualy are too thick for a 1:12 version of the original but better than no scratched out decoration.

For me this was a whole new technique and the second reason for me to try and miniaturise this particular plate of prince William III.  More Details need to be added but first these plates have to be fired in the kiln. 

At this point I still had some time left and started on a wide bowl that I wanted to decorate in the style of the picture above. Not an exact copy this time, but a spontanious design inspired by this 'kraak porselein'. 

I only had time to ink the outside of the bowl. The inside and the painted details on both sides wil have to wait until the next workshop in oktober. 

Well  that's it for now. Take care,

Huibrecht 


Tuesday, 28 March 2023

Weapon of choice


Hello my friends,

The first post of this month and already march is almost over. It shows you how busy I have been these last few weeks. No mini-time at all alas. But luckily I had a workshop in my  agenda so that this month is not completely lost for miniatures. Last weekend I attended another Workshop for porcelain painting. I used this day to finish up the four tile tableaux I started in januari. 

So the 'weapon' in this posts title refers to the paint brush! My 'personal weapon of choice  would most probably be the pen, but since I write almost everything I do on the computer I probably pick up brushes more often than pens nowadays... So the brush it is!


In january I ended up with these four  tableaux. The four drawings I prepared in pencil in advance were 'inked' during thAt workshop and the red was already added to the Zonneschut family crest.  When these were fired in the kiln afterwards, the little morcels of Pritt buddies that sticks them on the tile underneath evaporated into a powder. 

So the first job this day was to brush away all that powder, clean the large tile and the 84 little ones, and stick them all back onto the large tile with new pieces of Pritt buddies. that process was going on in the picture below. 


After these preliminary tasks the workshop could begin un earnest for me. We were at Cocky's house with the same group of people as in january. It is a great group of people and we had a lot of fun in between the more serious subjects we discussed around the workshop table. And it happened a few times that we suddenly all fall silent while concentrating on our miniature porcelain. But as soon as it was time for tea, a snack, or a little pause, we resumed the trail(s) of conversation where we had left off.

Just as with the making of the Tableaux of the two princes last year, this time I added colour and shades to fill in the line drawings. This gives them body and some depth. The clouds were difficult to do because they were not drawn previously but had to be made by using a paint brush alone. With one brush you add some small C-scrolls in paint onto the blank sky. Then with a dry wide brush you lightly brush over them to brush them out and lift off some of the paint again. This way I try to make it light and airy. Cocky showed me the method and told it is the same or at least similar method used to paint clouds on antique tiles. It was fun to do, and more importantly, another technique learned. 


At the end of the day The result was as you can see in this picture. Four tableaux waiting to be fired for the last time. The three landscapes are intended for the kitchen and the crest carried by the hounds wil go in the fireplace of the steward's office. 

That is it for now. I end the post like I started it, with another close up. Just remember that when you look at these enlarged, that the 5 tile width of this tableau equals just 5 centimeters or two inches. :-)

The next workshop will be in early June. For now I have made enough tableaux. Next time I will decorate a few plates or a pair of vases.

Hugs, 

Huibrecht

Monday, 16 January 2023

Little Country pleasures


Hello my friends,

Already it is the middle of january. There is some progress on the dressing room for lady Zonneschut, but I will show you that soon in another post. Today I want to show you the progress made on the first workshop I attended in 2023. And for those of you who have been following my little blog for a while, will recognise in the first picture one of the steps of painting porcelain. 

Sometimes I decorate plates and vases in freehand. But here, just like the tile tableaux of Prince Maurits and Prince Frederick of Orange, I prefer to transfer the scenes onto the tiles first. And this stage is done at home so that I can start with the actual painting as soon as possible during the workshop.

In the picture above you can see prints of designs used for painted tiles made in Rotterdam from the 17th up to the 19th century. Rotterdamse Pleziertjes (tegels-uit-rotterdam.com) These were meant for single tiles but when you reduce it 12 times little remains of the little country scenes. These scenes are called 'pleziertjes' (pleasures) and depict scens of people enjoying the good life. Either in stately gardens or in the countryside. 

I chose 3 scenes and intend to use these tableaux in the tiled kitchen. They look like an echo of the gardens and landscape that surround Huis ter Swinnendael bat are not visible. The fourth tableau is not intended for the kitchen and is not a 'pleziertje'. But more on that later. 


I colour the backs of these images with pencil, tape them onto the tiles and then draw over every line with a ballpoint pen, pressinggraphite from the back of the image onto the tiles underneath. 
When you have traced all the necessary lines of the drawings you get something like you see in the pictures above. 

You can also see the big tile with the little 'tableaux-to-be' in a blue box. This is a lunchbox that held some lovely presents I received for Christmas from Birgit of the Biwubaeries blog! I whill show you those lovely gifts she send me in the next post on the progress on the dressing room.


This picture is taken during the workshop given by Cocky Wildschut. As you know I try to attend every year one or two times. More if possible. Because I so love to do this. The first step is rather easy. Simply retracing all the pencillines with 'drawing ink' (porecelain paint in a different mixture from paint used for painting).

At this stage you can add or leave out a few details if you so wish, but you do not yet fill areas in with colour. That will be done during my second workshop of this year after these lines are fixed due to firing these tiles.

The "inked" drawings look a bit smudgy but that is the loose graphite powder of the traced drawing. That will burn away during firing making the result more crisp and smooth than it looks now.


And what about that fourth tableau? Well that is a design of my own creation. It shows you the heraldic crest of the Zonneschut family enveloped in a rococo frame and held up by two hounds. Those of you who have followed this blog for some time will know I love hounds. And therefor I only find it fitting to have them supporting the crest rather than lions or other animals. 

When you look closely you can see that one supporter is female (in honour of Tara) while the other is male (in honour of the late Bosie).

The motto written on the scroll around the base reads "Ut vitam cum grano salis" which happens to be my personal motto. (what a coincidence ) ;-)

It translates in english (litteraly) as "take life with a grain of salt", which means to me "Do not take everything too seriously". In other words a little levity from time to time makes life nicer. Do with it, or think of it, what you will. But I am happy to have this as my personal motto.

Just like the tableaux I painted earlier all will get a monochrome decoration in blue. Except this one. The two red fields in the escutcheon (and the collars as a detail) are already filled in. In the next workshop I will fill in the two yellow fields and the blue around the diamond shapes. This exception will let the coat of arms stand out from the otherwise monochromatic tableau. 

But I will have to wait until the end of march to continue on these pieces. So back to the dressing room!

Be well, 

Huibrecht 


Tuesday, 28 June 2022

Home is where the heart(h) is 4d: the 2 princes finished and a third one as a bonus.


Hello my friends,

Last saturday I had another workshop painting miniature porcelain in the studio of Cocky Wildschut. That day I finished the tableaux of Prince Maurits and Prince Frederick. Two brothers who, (first Maurits and then Frederick) followed in the footsteps of their father, William I (a.k.a. William the Silent) as Stadhouder of the Dutch Republic. 

As you can see I only deepened some shadows and added some details by adding a layer of porcelain paint to some area's. For example in Maurits' case I added a layer of colour to the shadow part of the tablecloth and to his hair and beard. Plus some added shading here and there to accentuate the form of limbs, the ostrich plumes on the helmets and such.
 And, while I write this a few days later, I know that today the kiln is fired up to fire them and seal the paint within the glazing.

As you can imagine these did not take me an enitire day to do. So before lunch I had time to work on a new project. A small project in respect to the 104 tiles needed for both Maurits and Frederick. It is a plate decorated in free hand. Depicting William V, the last Stadhouder who fled the republic during the Batavian Revolution in 1795.

I have told you before that Since the founding of the republic there were two important factions in Dutch politics. Those that wanted the Prince of Orange as Stadhouder. They were called 'Orangisten' The title Stadhouder originates from the middle ages and was officialy something like the commander in chief, while the States General (parliament) had the last say in all affairs. Some Orangisted wanted the prince to be king but in name only. Orangists could belong to the nobility, who had ties with the court, right down the social ladder to the paupers in the slums. 

The other faction wanted the States General to have the last say in everything and really did not see the need for any prince of Orange to command the Republic's armies and meddle in the states affairs. They were called 'Staatsen'. They were predominantly wealthy regent oligarchy which rather ruled themselves free from the house of Orange.

I will not turn this into a history lesson.  The whole story fills several books. But through the 16th, 17th and 18th century one or the other faction would be dominant. In the second half of the 18th century a new faction was on the rise. Called 'patriots' not to be confused by the modern day meaning of the word. They embraced the ideals of enlightenment like democracy, human rights, sovereignty of the people, and disgusted by the (perceived) decadence of the circle of the court ánd the oligarchic regents. They came from the ranks we would call the (upper) middle classes, the wealthy regent families and the lower aristocracy. They wanted the old republic with autonomous provinces overturned peacefully and to found a centralised state with a constitution and all the works in its place. No House of Orange and no closed oligarchy which only looked at the interests of their own class. 

One of the ways in which Orangists would show their sympathies (since William III Stadhouder of Holland and king of England) was through creamware or porcelain depicting the then "ruling" prince and or orange trees. Often with acronyms on the front. 
Or with added verses and slogans.

This plate has the acronym "PVOR" meaning "Prins Van ORanje" or Prince of Orange. And "WdV" means "Willem de Vijfde" or William the 5th. This plate is my own design, based on two different pieces of which the plate above is one of them.

On a next workshop I may make a pendant for this plate with Princess Wilhelmine, the wife of Willem V. She never figures alone on a plate or vase, it is always the prince or the couple together, but having her facing him on her own plate could be a nice subject for a future plate. 

Lastly you can see a a porcelain jug. I decorated it with a dark carmine red. after firing it will need a little golden edge to finish it off. 
 
Well, that is it for now. Have a great day,

Huibrecht

Saturday, 21 May 2022

Home is where the heart(h) is 4c: Adding some colour to both princes.


Hello my friends,

Last weekend I had another workshop to work on the two tableaux of decorated tiles for the back wall of the fireplace of the drawingroom of Huis ter Swinnendael.


During the last Workshop in april. I had drawn all the lines of the two different drawings in blue porcelain "ink". Now it was time to fill in some colour and add some shade where needed. 


But first I had to reattach all 144  tiles and remove the dust. This dust is what remains of the pritt buddies with wich the little tiles are stuck to the large tile. With the firing in the kiln the moisture evaporates and all that is left is this powdery dust.


It took me over two hours to fix every tile in place. But now the painting could finally start in earnest!


It is hard not to put to much porcelain paint on your brush. It would make thick and dark patches of coulour. It gives you much more control and a much better result when you build up the colour through two or more thin layers. Making the translucent blue deeper and darker with every go. On the other hand, when you keep brushing you take some of the paint away, making the colour lighter again. 


At the end of the day. I added the colour where I wanted it. In the above picture you see a "before & after" compilation of Prince Hendrick. Or actualy I should say an "after and before"compilation... 

What happens next? Now the tiles will be fired again in the kiln. Next time (the end of june) the process of today will be repeated so I can add the final touches where needed. Hopefully I can start on the construction of the fireplace itself. 

Huibrecht 


Monday, 3 May 2021

Furniture: More screens


Hello my friends,

I showed you all a post in 2019 where I showed you how I made a 1:12 folding screen or paravent. As you may know I am part of a small facebook group where we all build our own 'castle room'. Apart from monthly assignmemts every member gives the group a workshop.

In the current covid situation these are held via chat. Crafting in front of the computer while trying not to glue yourself to the keyboard.

As you may have guessed my workshop was about making an antique folding screen, fit for a castle. It is the first ever workshop I have written and given. It was great fun to do and people have made great folding screens.

To make the written description for the workshop I needed pictures to show each step. And for that I needed good pictures. 

So I made a second screen for the purpose of the pictures. And during the workshop I made a third one. So now I have 3 folding screens for Huis ter Swinnendael. With 22 rooms I probably find a good place for every one. 

Unfortunately I can not show you the great screens the participants made, but I can show you mine. On the picture above you can see all three together. 

Huibrecht

Saturday, 16 May 2020

My self decorated miniature porcelain. (No workshop due to Covid-19) :-(

Hello my friends, As you all may know I love porcelain. As well as 1:1 as in miniature. Today I would have attended my fifth workshop given by Cocky Wildschut. I have learned so much from her, but there is a lot more to learn yet. 

However, todays workshop was cancelled (well in advance) due to the Covid-19 pandemic. Having lost a good friend to Covid-19 I take this disease very seriously. I totally agree with the cancelation of the workshop, but when my calender told me  that today would have been the day, that made me a little sad. 

So what to do? Without anything new to show you, I decided to make a little overview of the items that I have decorated in the last 4 workshops I did attend. Memories of four happy days! 


In the first two workshops I decorated the items in the picture below. They are partly chosen by Cocky in order to teacht certain techniques. The plate with the bird and the blue bowl were pieces I decorated myself using those techniques.


The bowl and two plates on the left were assignments to learn the basics of  porcelain painting. The bowl and the plate on the right were my own choices. The small polychrome plate was the first miniature plate that I decorated and in the back of my head I had that nagging feeling that I had seen the plate before. I could just have asked about it? Cocky would have told me. But when I was rummaging through my books on miniatures I came across this familiar photo!


The little plate with the red flowering tree and the little blue stream is a design based on one of the plates that stand on the mantle shelf in the large kitchen of Petronella Oortmans babycabinet in the rijksmuseum. Petronella has 9 of these plates on that shelf. They are called Arita ware or Kakiemon ware which is a type of Japanese porcelain. And then I knew that I wanted a series of those little Kakiemon plates for Huis ter Swinnendael!


The blue and white decorated porcelain is very classic and desirable, but it is not the only porcelain that was collected.  I wanted to make a small collection of these Arita plates. In the third workshop I asked Cocky if I could make more of this type of plate. But I did not want to make six more plates that look the same as the first one. So I took the Original design where the tree stands in the middle, (named M.) And drew two alternative designs in the same style. With the tree on the left (named L.) and with the tree standing on the right (named R.)Than I drew a few more of these basic designs to get it in my fingers.


And here is the result. Seven plates with three basic designs. The biggest difference between them is the placement of the red blossoms on the branches. They differentiate the look of the plate and on the first glance they all look different although they have three basic designs. This is also the case on the 17th century ones. I am happy with the result. I plan on placing them on the mantle shelf of the fireplace in the stewards office.


The next item is this large plate. The photo was taken just before it went into the pottery kiln. It has a decoration of a deer and a stag and is heavily decorated. In the left pic I put on the decorations with pen. In the second I filled certain surfaces with the brush or used the brush to add shades.  The shading was done in the fourth workshop after the penned design had already been fired in the kiln.


The remainder of the workshop I used on decorating a few vases. They are not ready yet, I have to finish them in a next workshop but you can see where I am going with these. I had a lot of fun following the workshop . Cocky, her husband Rien and the other participants are all so very nice. It was another well spent afternoon.

I hope that a vaccin is found soon so that the world can become normal again. And when the workshops are resumed, I will have a lot of ideas for new items. :-) 

Well that's it for now. I hope you have enjoyed this little post. Till next time!

Huibrecht


Sunday, 19 May 2019

Workshops! Learning and making new things.

My loot from the Show in Arnhem of last march
 Hello My friends. First a welcome to Isabel Ruiz Alonso for becoming the newest follower of my blog.

It has been very quiet in here these last few months. Not for lack of interest but because of the lack of time. A lot has happened these last 4 months. Some of these things were very good others were sad. Each of these things needed time and attention. And as all of you may know, that puts ones hobby on hold.

But luckily I have yet again time to devote to miniatures and I wanted to let you know that now that spring is in full bloom, so too Swinnendael is coming back on track.  :-)
Not that I have done nothing. I have bought some wonderful miniatures. All of great makers. I will show some of them in the coming weeks. But for me this hobby is also important in the sense that I want to máke things.

It is only miniatures yet. Rooms have to wait until after we moved to another house next month. That's right, We are selling our house and moving to a neighbouring town. Unfortunately moving the furniture is not as easy as moving the miniatures. :-)


But I did follow two workshops! The first was a workshop for miniature marbling. The workshop was given by Simone van Kasbergen prior to the Anhem Dollhouse Show last march. First she taught me the technique for making Carrara Bianca, white marble with grey veins. The white basecoat the different colours of grey we mixed with white and a tiny amounts of black. And then the difficult part of layering the stains and veins in order to produce a realistic translucency, depth and design of the marble.


After trying it out on a piece of cardboard we started on a plaster fireplace. You may recognise it as one of the models made by Alison Davies. It so happens that I already wanted this model for the small salon on the bell-etage of Swinnendael. So the fact that Simone had chosen this fireplace for the workshop was very fortuitous indeed! 


And here is the result. I could not finish the gold painted details in time but I am very happy with the result. I have the gold paint and varnish to finish it now. The workshop was great fun and Simone is a great teacher who has given me a lot of tips about the techniques of faux marbling and the intricacies of different types of marble.

In the picture above you also see my loot from the Show in Arnhem besides the fireplace. I did not buy the miniature Khang-Xi vase, that was a birthday gift from last year. But I did buy a lovely copper candlestick from small-scale and three porcelain plates made by Cocky Wildschut. And that brings me to my second workshop this year. Miniature porcelain painting! I myself a lover of porcelain and although I do not really collect it (1:1) myself, a house like Swinnendael can't be furnished without a decent collection of Delftware and Chinese and Japanese porcelain!  


And so, after talking to Cocky and her husband Rien in Arnhem I bought a few plates and applied for one of her workshops.  With a small group of enthusiasts we gathered in Cocky's studio in her garden. I was the only one who had not attended a previous workshop but that was not a problem. Everyone could work at their own pace and on their own projects. In order to learn to paint porcelain, there are a few steps you need to follow. First we started with a small plate with a Kakiemon design. Some of you may recognise it as the design of the plates in the kitchen/diningrooom of the Petronella Oortman in the Rijksmuseum. 

In the picture above is my version of that plate. I am very happy with the result. The second plate shown on the black velvet was the next design I made. Unfortunately I totally forgot to take a picture of my plate but it looks quite similar to the original. :-)


For me everything was new. Cocky helped me patiently every step of the way. I finished the two plates quite quickly. So after I had finished I had time to spare. It was certainly not enough try my hand at the large bowl for workshop 2, but Cocky suggested to me, to try a free hand decoration. Who was I to say no at this opportunity? I chose a five sided plate and a reference plate for the decor of a bird on the branch of a little tree. The above picture is the result. The border decoration is my own invention and I experimented a bit with shading the blue paint.  

I am very happy with the result but you can aso see that I still have a lot to learn. It was great fun and I had a jolly good time! If I get the chance I will certainly follow another of Cocky's workshops. 

That's it for this post. I have also made a few miniatures of my own. I will show you those as soon as I have finished them. And furthermore I have had the opportunity to buy some exquisite miniatures I will show some of those pretty soon as well.

Thank you for popping in. Feel free to leave a comment below. Enjoy your own projects and till the next time!


Huibrecht