Showing posts with label flooring. Show all posts

Sunday, 22 January 2023

Build in progress: Lady Zonneschut's dressing room, the sash window and the finishing touches.

Hello my friends, 

I started this room as a lockdown project during the first year of the Covid pandemic. And now, after almost two years I have finally time to finish building it. It is the first miniature room I have brought to completion and it has been an interesting learning curve for me. 

In this post I will show you how I made the window to fill in that huge window opening. Well not really. I got so caught up in the work itself That I forgot to take pictures. The above picture tells a lot of the story though. I cut a piece of 2 mm thick cardstock to fit the window opening and measured out where the 20 windowpanes would end up in the window frame. After marking them and cutting them out I had the rough shape of the window. I glued a piece of moulding (visualy) dividing the window in two parts. Then I painted it and and let it dry. 

While the paint was drying I cut out a piece from a clear plastic folder. I would prefer to use wood and real glass for these windows but again, this roombox started as a "lockdown project" and I limit myself to the materials I had available at that time. So cardstock and plastic it is.

And here we have a look of the window from the outside at a dry fit. The outside is not yet painted. I like the glimpse it offers of the interior of the dressing room.

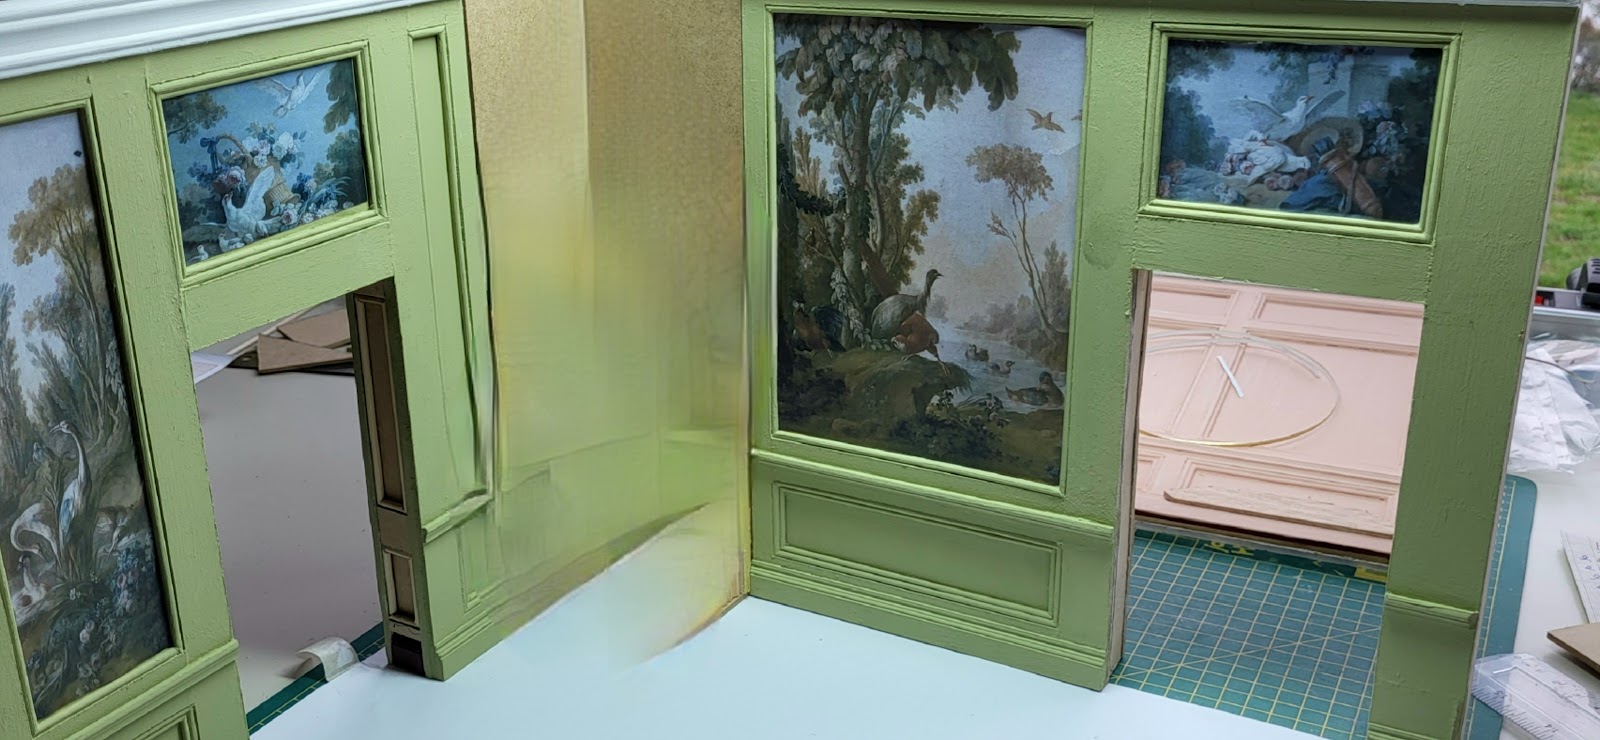
But it does not end there. Because of the altered layout the four original walls no longer connect to each other. So I needed to add some wall pieces to fix the pink background of the corridor or side room to the walls of the green dressing room.

And then you get something like this in the picture above. The dark brown pieces envelop the walls and tie everything together. After I glued the different wall pieces together it became one sturdy roombox. And that is for the first time. 
Until now the walks in all pictures of the room in  previous posts were made with paint cans and whatever was at hand placed behind the loose wall pieces to keep them standing upright. Now that all the wall pieces are fixed together the visible seams needed to be filled in, smoothed and painted over to hide them. 

And that brings us to the dressing room looking like this. A window in place and no gaping gaps in the corners. We're really getting somewhere now! And now it was time to cut the floor and ceiling panel to size. 

And speaking of the floor panel, my chosen floor, the print of a highly decorative parquet floor had started to anoy me a bit. The wallpanels in this dressing room are also decorated with prints and so is the ceiling. Lockdown project or not, all these prints together are becoming a lot of prints for just one room....

So why not try an alternative for the floor?

So, with the help of the brown paint that I used for sealing off the supporting wall pieces I tried to mimic a wood grain for a plank floor. I added the paint with a large brush in a layer thin enough to let the white undercoat shine through in places.

Although the result is bit coarse for 1:12 it looks quite decent for a first try. With a sepia coloured fineliner I have given the illusion of individual planks. 


Now all this is done, it is time to furnish the room and make whatever miniatures are still missing. The picture below
is just a first set up. The "yoga mat" on the floor is just a placeholder for the Chaise longue I am making. But that will be the subject of another post. 


Monday, 14 November 2022

Build in progress: Lady Zonneschut's dressingroom, doors and floors


Hello my friends,

In may 2021 I showed you the last actual work done on the dressingroom of lady Zonneschut. I started work on the dressing room (or 'chambre de poudre' as the nobility in the 17 hundreds loved to us french for everything,) in january of that same year. In the Netherlands we were in lock down at that time because of Covid and I wanted a lock down project. Using materials I had lying around already without ordering new materials online. After the lock down(s) ended daily life soon took over and the build of Huis ter Swinnendael was put on the back burner. Now it is high time to resume work on this room!

The painted wall hangings in this room are copied from the 'Salon Demarteau' which is one of the period Parisian interiors that are on display in the Musee Carnavalet in Paris. As you can see the walls here are painted from top to bottom. I want to let some of the putti that adorn the doors in the salon Demarteau come back in the dressing room. 

But before I started work on the doors I should first finish the door openings where the doors go into. They still needed to be divided into panels and decorated with bamboo skewers like I did on the walls and the window opening. Besides that the door opening in the (new) back wall also needed an opening cut out of it. Because I changed the plan for Huis ter Swinnendael as a dollhouses with outer walls into room boxes within a large mahogany wardrobe this room is rotated 90 degrees and there is no longer need for a fourth wall acting as a door. 

This fourth wall was the one with the window in it so you could still look into the room when the door was closed. Now the room is turned so that a side wall with only a suggested door has become the back wall. The suggested door now has to be a real door because the discarded wall will be used as the back wall of a small room leading off of the dressing room, and visible through the yet to be cut door opening. 

The Anteroom behind the dressing room can not have the same colours and painted wall hangings as the dressing room. So the painted landscape with birds is ripped out and filled in with some mdf and cut bamboo skewers to turn it into a fully paneled wall. I continued cutting down skewers for the panels in the door openings. The total amount of the cut pieces of bamboo skewers in this room box has reached 204. (yes I counted every one of them!)

When the glue had dried I painted the wall in a coral pink to keep it light and set it off from the sage green of the dressing room. The door openings were painted green or pink depending on the place of the door in that opening.

Now it was time to turn my attention to the doors themselves. The cut-out from the back wall fits right in the door opening so that will be my door. Waste not, want not. I first printed some of the putti amidst flowers and foliage to cover the whole door. Belonging to the same room they go along the painted wall hangings well. But covering the whole door looks very bad indeed. At least it does to me.


They need to be framed as a central panel for a door to fit in the scheme of the dressing room. I cut a frame from 2 mm card stock. cut out a central panel and lined it with cut pieces of 2 mm skewers. 4 pieces per door multiplied by 2 doors, that brings the total to 212 pieces of cut bamboo in this boombox!

After the glue had dried I painted it sage green. Printed a smaller version of the putti adorned fountains, cut them out and glued them onto the door. Glued the frame over that and, "et voila", a finished door. 

Well apart from the doorknob and the hinges of course. That I will make soon in order. I have them lying around somewhere... but where? Never the less, I quite like this door, much better than the test run. Now I have to make the second door like this as well. 

With the doors covered (literally and figuratively) it is time to turn my attention to the floor. Although parquet floors were not very popular in the Netherlands until the end of the 18th century (the elite preferred wooden planking that could be scoured clean every week) I want to turn this dressing room into a luxurious little jewel box. Lady Zonneschut uses this room, apart from dressing and bathing,  as her little boudoir. And let me tell you that she is not impartial to a bit of luxury!

Therefor this exuberant design for a parquet floor with scrolls, flowers and garlands will become the exception to the rule. I will tell you right away that I will cheat here. Instead of copying this design in real veneer I use paper prints that I will varnish several layers.  

I am tempted to try and cut this floor design out of veneer, but that will be a future project. Now I want to finish this room box. Preferably before Christmas. 

Well that is it for now. I hope you have enjoyed reading this as I have of showing you this progress. The picture above also reveals the topic of my next post. If you look closely you will see something new and unfinished in it...

Huibrecht