Showing posts with label chambre the poudre. Show all posts

Sunday, 22 January 2023

Build in progress: Lady Zonneschut's dressing room, the sash window and the finishing touches.

Hello my friends, 

I started this room as a lockdown project during the first year of the Covid pandemic. And now, after almost two years I have finally time to finish building it. It is the first miniature room I have brought to completion and it has been an interesting learning curve for me. 

In this post I will show you how I made the window to fill in that huge window opening. Well not really. I got so caught up in the work itself That I forgot to take pictures. The above picture tells a lot of the story though. I cut a piece of 2 mm thick cardstock to fit the window opening and measured out where the 20 windowpanes would end up in the window frame. After marking them and cutting them out I had the rough shape of the window. I glued a piece of moulding (visualy) dividing the window in two parts. Then I painted it and and let it dry. 

While the paint was drying I cut out a piece from a clear plastic folder. I would prefer to use wood and real glass for these windows but again, this roombox started as a "lockdown project" and I limit myself to the materials I had available at that time. So cardstock and plastic it is.

And here we have a look of the window from the outside at a dry fit. The outside is not yet painted. I like the glimpse it offers of the interior of the dressing room.

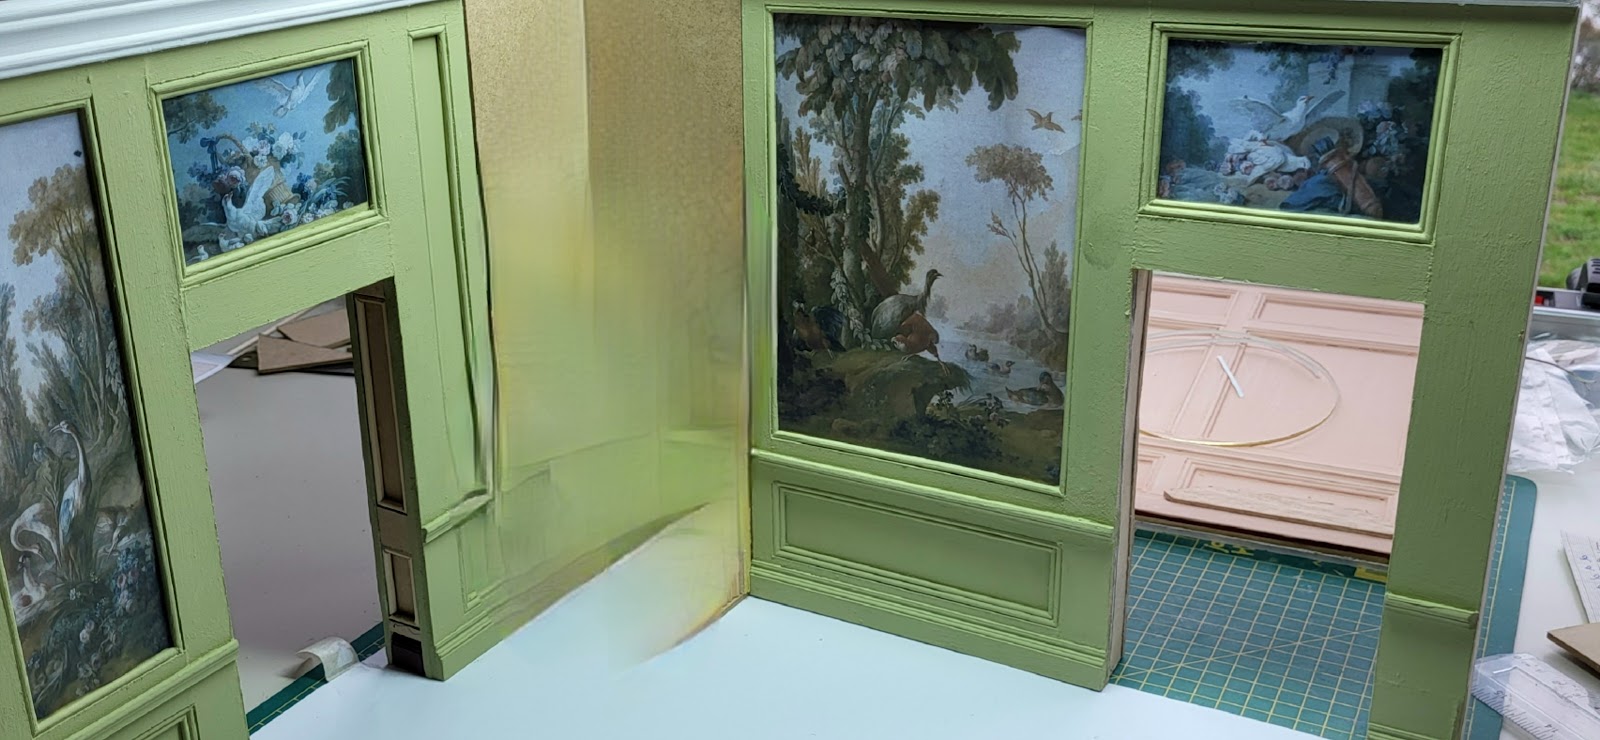
But it does not end there. Because of the altered layout the four original walls no longer connect to each other. So I needed to add some wall pieces to fix the pink background of the corridor or side room to the walls of the green dressing room.

And then you get something like this in the picture above. The dark brown pieces envelop the walls and tie everything together. After I glued the different wall pieces together it became one sturdy roombox. And that is for the first time. 
Until now the walks in all pictures of the room in  previous posts were made with paint cans and whatever was at hand placed behind the loose wall pieces to keep them standing upright. Now that all the wall pieces are fixed together the visible seams needed to be filled in, smoothed and painted over to hide them. 

And that brings us to the dressing room looking like this. A window in place and no gaping gaps in the corners. We're really getting somewhere now! And now it was time to cut the floor and ceiling panel to size. 

And speaking of the floor panel, my chosen floor, the print of a highly decorative parquet floor had started to anoy me a bit. The wallpanels in this dressing room are also decorated with prints and so is the ceiling. Lockdown project or not, all these prints together are becoming a lot of prints for just one room....

So why not try an alternative for the floor?

So, with the help of the brown paint that I used for sealing off the supporting wall pieces I tried to mimic a wood grain for a plank floor. I added the paint with a large brush in a layer thin enough to let the white undercoat shine through in places.

Although the result is bit coarse for 1:12 it looks quite decent for a first try. With a sepia coloured fineliner I have given the illusion of individual planks. 


Now all this is done, it is time to furnish the room and make whatever miniatures are still missing. The picture below
is just a first set up. The "yoga mat" on the floor is just a placeholder for the Chaise longue I am making. But that will be the subject of another post. 


Friday, 23 December 2022

Build in progress: Lady Zonneschut's dressingroom, fireplace and ceiling.


Hello my friends,

One of the key elements in a period room is the fireplace. Often the only means of heat and light in a room.  Until now this vital element was missing. And in a dramatic way even. As seen in the picture below it was a large white void in an otherwise colourful room.
Because the dressing room of Lady Zonneschut is a relatively small room I chose to give it a corner fireplace. With real live versions in my mind I perused my (growing) stash of bits and bobs and offcuts of mouldings to see if I could turn this fireplace into a decent 17th century model.


I did. I made a list if the pieces I needed to cut to fill up thel corner and build up the fireplace. 
I cut out a square hearth floor on which everything would be built. I cut away one corner to give it a decorative edge. 


Originaly the moulding surrounding the opening would stand on a rectangular base. You can see these rectangular pieces 2 pictures up. But these would hang over the outer lines of the hearth floor. That did not look good! So I discarded those together with the now too short mouldings for the sides. I cut 2 new pieces to span the full height of the opening. To me this looks much better. 

But I was not ready to paint yet. Between the mantle shelf and the fireplace mantle I added two brass S-scrolls. I added a few layers of card stock at the bottom and the top of the S scrolls to tie the fireplace surround together with the top moulding. These elements together will form on their turn the surround for a mirror.


I painted the floor and mantel of the fireplace in a dark indigo blue mixed with ivory black. The rest was painted in the sage green I used for the rest of this room. The mirror is a mirror foil and the frame consists of pieces of gilt Dresden paper banding. One day I may replace this with real mirror glass when I find some that is thin enough. But for now this will do nicely.


The blue elements of this fireplace will be marbled of course. The surround should look like a marble or other kind of decorative stone. Using translucent white mixed with acrylic medium I softened the dark blue. The veins are a bit rough and the brighter white dots should resemble little pockets of quarts in the marble. These soften the stark blue base coat.  Do you like it?


The bottom half of this fireplace is now pretty much finished. It now mostly needs to be filled with a hearth plate, a pair of andirons and my original plan for the top half was a number of decorative corbels to display a selection of blue and white porcelain.  But that I will make for another, larger room.  

Here I want a painting that fits into the scheme of the room. I have chosen a panel of the Salon Demarteau with a statue of Cupid amidst the same foliage and roses of the putti fountains i have used for the doors of this dressing room. Here Cupid is supporting an arrow in one hand and a laurel wreath in the other while looking pleased with himself. I am sure that this painting personifies "Amor Vincit Omnia"(Love conquers all) I think that is a nice theme for this room that is the private sanctuary of a lady. 


Just like with the doors I want to frame Cupid as a central panel above the fireplace to fit in the scheme of the dressing room. I cut a frame from 2 mm card stock. cut out a central panel and lined it with cut pieces of 2 mm skewers. These 4 pieces brings the total to 216 pieces of cut bamboo in this boombox! 


Then it was time to paint all the additions green, as you can see in the picture above.And with that done, it is time to turn the attention to the ceiling of this room. Originally I had planned a white ceiling for this room. Just like you can see in the picture above. White stucco ceilings with or without sculpted decorations and/or with a painted central medallion was often the popular choice from the second half of the 17th century up to the 3 quarter of the 19th century. The white ceilings helped to reflect the soft candle light, making the best use of the light of each little flame.


But with the advent of bright gas light it became too reflective. To reduce the glare and soften down the light of this fashionable new light source they started to use colours to cover up the white ceilings again. But the design I have chosen for the painted ceiling predates all that. This design is from around the year 1700.


The sage green of the walls is quite a cold colour. Together with a white ceiling it  would make quite a cool room. But I want this room to show warmth! A luxurious little room to withdraw oneself from the hustle and bustle of a large country house with family, guests and servants. So therefore I turned to another popular ceiling treatment back in the 17th century. The painted wooden ceiling. It is old fashioned and outdated in the time of lady Zonneschut but it was still very popular when the house was built in 1675. So a painted wooden ceiling it wil be!

Imagine that the original beamed ceiling is covered by planks. Hiding the beams from view. This gives a flat surface to paint. The design I have chosen was found on the internet (the site of the Rijksmuseum) and is made by Elias van Nijmegen (1667- 1755).Apart from paintings and portraits he also designed and made interior pieces like overdoor paintings and ceilings.

Because the ceiling in this dressing room will no longer be white the cornice around the ceiling can't stay white either. In period rooms with painted wooden ceilings these cornices, when present, usually get the same colour as the rest of the walls. So here you can see them in green. This changes the look and feel of the room more than I expected it would. The coloured cornice and ceiling make the room look smaller, more cosy and more late 17th century. 


Well my friends, we have come to the end of this post and at the same time Christmas has almost arrived. Only two more days. I hope that the world we be a better place for all living on it than it has been the last year.  

Just to show that it can be quite peaceful, a picture taken from my livingroom last weekend. The ice is gone now, thaw has set in to the delight of the birds and other animals. No white Christmas for us this year. But that is not the most important element of the celebration ofcourse. 

I wish you and your loved ones a very merry Christmas! Enjoy!

Huibrecht


Monday, 14 November 2022

Build in progress: Lady Zonneschut's dressingroom, doors and floors


Hello my friends,

In may 2021 I showed you the last actual work done on the dressingroom of lady Zonneschut. I started work on the dressing room (or 'chambre de poudre' as the nobility in the 17 hundreds loved to us french for everything,) in january of that same year. In the Netherlands we were in lock down at that time because of Covid and I wanted a lock down project. Using materials I had lying around already without ordering new materials online. After the lock down(s) ended daily life soon took over and the build of Huis ter Swinnendael was put on the back burner. Now it is high time to resume work on this room!

The painted wall hangings in this room are copied from the 'Salon Demarteau' which is one of the period Parisian interiors that are on display in the Musee Carnavalet in Paris. As you can see the walls here are painted from top to bottom. I want to let some of the putti that adorn the doors in the salon Demarteau come back in the dressing room. 

But before I started work on the doors I should first finish the door openings where the doors go into. They still needed to be divided into panels and decorated with bamboo skewers like I did on the walls and the window opening. Besides that the door opening in the (new) back wall also needed an opening cut out of it. Because I changed the plan for Huis ter Swinnendael as a dollhouses with outer walls into room boxes within a large mahogany wardrobe this room is rotated 90 degrees and there is no longer need for a fourth wall acting as a door. 

This fourth wall was the one with the window in it so you could still look into the room when the door was closed. Now the room is turned so that a side wall with only a suggested door has become the back wall. The suggested door now has to be a real door because the discarded wall will be used as the back wall of a small room leading off of the dressing room, and visible through the yet to be cut door opening. 

The Anteroom behind the dressing room can not have the same colours and painted wall hangings as the dressing room. So the painted landscape with birds is ripped out and filled in with some mdf and cut bamboo skewers to turn it into a fully paneled wall. I continued cutting down skewers for the panels in the door openings. The total amount of the cut pieces of bamboo skewers in this room box has reached 204. (yes I counted every one of them!)

When the glue had dried I painted the wall in a coral pink to keep it light and set it off from the sage green of the dressing room. The door openings were painted green or pink depending on the place of the door in that opening.

Now it was time to turn my attention to the doors themselves. The cut-out from the back wall fits right in the door opening so that will be my door. Waste not, want not. I first printed some of the putti amidst flowers and foliage to cover the whole door. Belonging to the same room they go along the painted wall hangings well. But covering the whole door looks very bad indeed. At least it does to me.


They need to be framed as a central panel for a door to fit in the scheme of the dressing room. I cut a frame from 2 mm card stock. cut out a central panel and lined it with cut pieces of 2 mm skewers. 4 pieces per door multiplied by 2 doors, that brings the total to 212 pieces of cut bamboo in this boombox!

After the glue had dried I painted it sage green. Printed a smaller version of the putti adorned fountains, cut them out and glued them onto the door. Glued the frame over that and, "et voila", a finished door. 

Well apart from the doorknob and the hinges of course. That I will make soon in order. I have them lying around somewhere... but where? Never the less, I quite like this door, much better than the test run. Now I have to make the second door like this as well. 

With the doors covered (literally and figuratively) it is time to turn my attention to the floor. Although parquet floors were not very popular in the Netherlands until the end of the 18th century (the elite preferred wooden planking that could be scoured clean every week) I want to turn this dressing room into a luxurious little jewel box. Lady Zonneschut uses this room, apart from dressing and bathing,  as her little boudoir. And let me tell you that she is not impartial to a bit of luxury!

Therefor this exuberant design for a parquet floor with scrolls, flowers and garlands will become the exception to the rule. I will tell you right away that I will cheat here. Instead of copying this design in real veneer I use paper prints that I will varnish several layers.  

I am tempted to try and cut this floor design out of veneer, but that will be a future project. Now I want to finish this room box. Preferably before Christmas. 

Well that is it for now. I hope you have enjoyed reading this as I have of showing you this progress. The picture above also reveals the topic of my next post. If you look closely you will see something new and unfinished in it...

Huibrecht 


Saturday, 22 May 2021

Build in progress: Lady Zonneschut's dressingroom, the panneled walls

Hello My friends,

In january 2021 I first posted on the building of Lady Zonneschut's dressingroom. It will be a small room. In Dutch these are called "kabinet" or "kabinetje" and were private rooms used for all sorts of purposes. Dressing rooms, study's, boudoirs et-cetera.

This picture shows my original plan for the room. A bit bland to be honest. Lady Zonneschut's dressingroom/boudoir deserves a bit more grandeur. 

so I changed it for green painted panneled walls with the large panels filled with painted landscapes with birds and other animals. 

We in the Netherlands experience now the first step out of lockdown with reopened shops. But I started this room during full lockdown where all but essential shops were closed. 

The dressingroom is my lockdown project so to speak. And when I started it was very difficult to get materials. So I had to make do with all the material I had in my stash. That was not a lot. I was/am espescially short on trims and mouldings. 

And that is a setback if you want a room covered in luxurious panneling. But then I thought of a back of bamboo skewers we have for making saté and other BBQ dishes. Summer is still a few months away, so why not use those?  I have two types. One type with a 3 mm diameter, and one thinner type with a 2 mm diameter. Using them together could work. 

After adding all the pieces there were some gaps to fill. After filling those and sanding what needed sanding the walls were ready for painting. All the panneling received a first coat of green. I had three soft green chalk paints to choose from. I chose Sage Green. The frieze near the ceiling was painted white to match the ceiling which will be made later. 

The large panels are left largely white. These will be filled in with prints of the painted wall hangings. After the wall with the window I painted the other three walls as well. And now the appearance of this kabinet turned from this... 
Into this...  The big white open corner on the right is where the corner fireplace will go. But that is a subject for a next post. 

Till then. Stay healthy and safe. 

Huibrecht