Showing posts with label Bust. Show all posts

Thursday, 28 December 2023

The 3 chess rooks: Pseudo jasperware urn and pedestal


Hello my friends.

Christmas was a few days ago and I hope that you have all spent those days enjoying yourselves with good company, good food and good cheer! I found some time around the festivities to work a bit on my many half finished ptojects. I started this "Jasperware" style urn back in June, but only this week it was ready to show it to you. 

In april 2023 in the post 'A Rook's Chessmate?' I showed you how I changed 2 rooks out of a small collection of second hand/damaged chess pieces into two pedestals for statuary. Each with its own style and decor.


That meant that one rook, the smallest of the bunch, was still waiting to be transformed. But what to do with it? Because of it's shape, and because I have only one of this size, the choices are somewhat limited. It can't be much more than a (part of a) pedestal or perhaps a decorative chimney pot? that is about it, I think. Alison's Marie Antoinette bust that I gave a faux terracotta finish looked good on the ebonised wood. But, nice as it was, it was jusy more of the same. A bit "meh", if you know what I mean. 


So it should be something else than another bust or statue. It became a vase. I had a resin urn with roman figures which had too many coats of paint on it so the reliefs were hardly visible, let alone decipherable. It lay in my stash waiting to be used for something. Inspired by some examples of Jasperware I wanted to try and give it that powdery matte Wedgewood look. 

First I used water and a toothbrush to remove most of the thick layer of paint. Next I tested what the finish would be if I used the porcelain paint pens I bought back in 2016 and haven't used since I decorated the egg cup garden urns that year. I quite like the blue although it is a hard colour clue. It fit's quite well with the Jasperware theme. I would love to have it a shade or two lighter, but I decided to go with it.


The porcelain paint in these pens are meant to be kaked in the oven. But when you let it dry in the air it sticks well to the surface of the object. And another advantage is that this paint dries up in a very matte finish when you not bake it in the oven. and since Jasperware is not glazed, that is exactly the finish I need. 

Even without baking it, it dries up hard and is rub resistant. So after covering urn and rook in 3 or 4 layers of ink with the marker it was time to think up some fitting decorations in the classical style Wedgewood is known for.


And these two drawings are what I came up with. To let the white decorations match with the blue I did not use paint and brushes. The lines should be sharp. So I brought out some white artists fineliners and scribbled away. After the first tries I got something like you see in the picture beneath. The vase is not quite ready and the pedestal only has the greek scroll penned on, but I quite like how this is coming together.

Since we are halfway decorating the pedestal and urn it was high time to decide if I would fill it. And if so, with what? I can leave it empty ofcourse, or make a lid to close it off. But in the end I decided that I want to fill it with something. 

Flowers were suggested by some of you in the previous post. I quite like the idea. However roses or mixed flowers somehow just do not seem right for this type of vase. But what else? I turned my attention to fruits and nuts...

Since it is december, a type of christmas decoration is not unlikely. Citrus fruits were very popular in these parts of the world around Christmas and assoiated with december. Inspired by the post of Jonquil in her blog ( Latchkey & Jonquil) about pomanders or pomme dámbre, I got out the fimo clay and started making lemons, oranges, and tangerines using her excelent instructions in her post. 

I also wanted to make pomanders, but I had no time to finish those. So the orange balls I had prepared for those were kneeded back into one big ball and stored in a plastic bag. Hopefully I'l find time to work on those in the coming weekend!


Around 1806 the use of Christmas trees was slowly, very slowly becoming fashionable in the Netherlands. Much later than for example in parts of Germany and England. What was fashionable already, was to use fruits and nuts and berries to decorate the houses of the well to do. Towers of fruits and nuts or confectionary were already used to decorate houses since the early 17th century. 

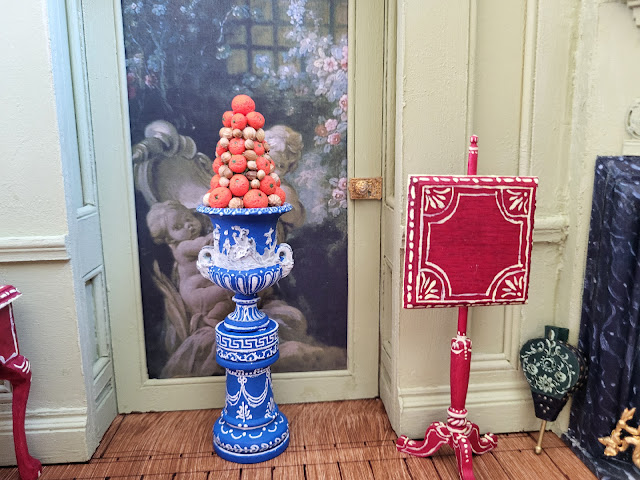
So my plan is to use some of the tangerines to make a piramidal display to decorate for the holidays. As nuts I used koriander seeds or cilantro seeds. I used some residual clay pieces to make a base and stuck on the tangerines and seeds to form a decorative ensemble. It was trickier than I had imagined it would be, but I got there in the end. 
But finaly it all came together to form this ensemble. Do you like it? I do. It was quite a lot of work to make this. The pens are very time consuming for this type of finish. So I will not make a huge collection of faux Jasperware, but I will probably make another faux Jasperware piece sooner or later...

Unfortunately, you can see the black of the resin shining through in pleces on hte urn. That is where the original pain on the urn has rubbed off while I handled it decorating it and filling it with the fruit and nuts. I will repaint that as soon as possible together with some other retouches here and there, but for now I call it finished!

If I do not find a time to post again before 2024 I want to take the opportunity to wish you all a very happe Newyear! may 2024 bring you all joy and good health!

Huibrecht


Thursday, 27 April 2023

Who killed King Louis?


Hello my friends,

Well, nobody has killed the Sun king as far as I know. And certainly not one of the Zonneschuts has had a hand in his death. He died of old age in Versailles. So why this weird title?

This bust in white metal is a miniature copy of the famous Bernini bust of Louis XIV that can be seen in the palace of Versailles. With a 7 cm (2 3/4 inch) height it is quite big for 1:12 scale. Too big for putting it on a table or the top of a bookshelf, but not too big for a collumn or pedestal in a grand hall or a garden. It just needs a bigger room than average in 1:12.


When I assembled the different parts There remained a visible gap between the face and the whig. An ugly open seam that needed to be filled. quite annoying. I experimented with some clay to fill and hide that gap and model it to resemble curly strings of hair. 

It worked quite well in closing the gap. But, in an eerie way, it looks like a blood trail, trickling down his face as a result from a blow to the head. That explains the title of this post. But thankfully nothing unsavory happened to "good old Louie".


However. That being the case, does not change the fact that the 'evidence' of this addition/reparation needs to be hidden from sight. If one wants to conceal something, conceal it well. In this case several layers of paint...

I decided to give this bust a terracotta finish. And not a light and fresh terracotta colour like I did on the woman's bust. No, this time I wanted a darker terracotta colour. Perhaps it has been weathered through standing outside in the garden for a few decades?


The first layer was a Revell skine tone. I applied it as a primer. A thin layer where the metal colour still shines through in places. And being a metal paint it is waaaay to shiny to pass as terracotta, but the next layers should cover that sheen.


Now it is time to deepen the colour. Although I know what result I want to achieve,  I make each step in the painting proces up as I go. I mixed a bit of primary red, some light Venetian red, and a small amount of burnt Sienna into a deep brownish red. And applied a layer onto Louis. When still wet it rather looked like the bust is made out of solidified curry ketchup....


I added some raw umber to the mixture and applied another thin coat of paint. Because the second layer was not yet fully dried I take of paint with my brush in places instead of applying it. With a bit of juggling more paint was applied onto the bust than was taken away. And afterwards it looks like the picture above.


I quite liked the result but it needed something more. I mixed some pigment powder together with acrylic medium and added it to the bust with a brush. This is layer number four.

And finally after the acryllic medium has fully dried we get something like this. The bust looks weathered and a bit flaky. The pigment powder has dulled down the sheen of the paint a lot. Which is good because terracotta is usualy unglazed and should have a matte finish.

Well, this is it for now, my friends. I hope you like this post about my journey to create a good terracotta finish. Although I like the result it is not yet the perfect recipe. Perhaps the next try will be perfect. So stay tuned! :-)

Huibrecht.


Tuesday, 11 April 2023

Miniatures; A rook's chessmate?


Hello my friends,

Two weeks ago we visited Amsterdam. We've dined with friends and went to see the Dutch National Ballet's performance of Tchaikovsky's  Swan Lake. That in itself has nothing to do with miniatures.  But first we went to a shop specialised in chess and board games. A great shop! To my surprise they had a few boxes in the back of the shop filled to the brim with surplus chess pieces. All kinds, old, some broken, wood, plastic and resin thrown together. If you have lost a piece of your chess set there is a good chance that you can find a replacement here. 1 euro per piece and 50 cents for a pawn. 


I however zoomed in on a few pieces for a different reason. Could I not use some of these for miniatures? After a search through the top quarter of the boxes (they were filled to the brim. What treasure remains hidden deep down?), I ended up with a few rooks ( we call them towers) and two bishops I'd like to buy. The bishops may end up as finials somewhere, I have no immediate use for them. The rooks I chose because of their model. These three do not get very thin at the top as with most models. And that makes them good candidates to be transformed into pedestals. Wether it is for a statue, a bust, a vase or an urn.


I started with this black tower. I filed the crenelations off untill I had a smooth top surface. I then played around with some pieces of round and octogonal mdf I had lying around. Leftovers from the bases of the blackamoors I have made. This in order to increase the pedestal's height.


Once I was happy with the configuration of elements I painted the chosen mdf pieces with ivory black to match the rook and added embelishments in gold paint.  The result you can see in the picture below. I tried to use the gold paint sparingly to give the pedestal a restraint classical feel and hopefully not an abundant Victorian one.

I still had Alison Davies' Caesar's bust lying around that I had bought together with Marie Antoinette's bust a few years ago. The latter I have given a terracotta finish but Caesar was still waiting to be painted. 

I wanted to try a wash of ivory black and water to give Caesar a greyish "unearthed white marble' look. This was not a matter of careful prior planning. It was a spurr of the moment idea. I had some ivory black left on my palette. So why not give it a try? I dipped  my brush in water, then through the smudge of black paint and brushed away.


The result was a bit too dark in my opinion. So I gave ve it a second wash with a watered down chrome white to tone it down a bit. That came out too chalky as you can see in the picture above. So the next wash I gave caesar was a medium grey mixture of ivory black and chrome white. All very warery so that the earlier layers and even the yellowish colour of the resin stillbshine through in places. They all add to the depth of the marbling. 

After the third wash it really started to look like something. Although the black had fallen away too much. So a wash with a lot of water and the tiniest amount of ivory black was the last "brush bath" I gave old Caesar. 

I did not redo the marble frame around the plaque. That only has the initial black wash on it. I want it to look like a renaissance addition to an original Roman bust so it ideally it a similar but not the same type of marble as the antique bust. 

It was a bit freightening. Just experimemting without knowing where it will/should end. But, I do understand now why many miniaturists like to use washes! This is definately not my last try. 

The second chess piece needed much less work done to it. It is an old piece and much of the old black paint has rubbed of by use over decades, or even longer! I wanted to keep that patina so no paintjob here.  

In the top photo you can see some damage to the top and bottom of the piece. The damage on the top mostly dissapeared with the removing of the crenelations. The damage on the bottom was mostly on one side. On the front side only two small damaged areas were visible. Using different brown and black colour pencils I colored the two patches to match the surrounding colours. Now they look like old damages. 

And that was all I did. I placed my antique seal stamp of the man in classical dress on it and I declared this pedestal finished. 


After these two pedestals the third rook remains to be transformed. I have not yet something fitting to place on it however. So this one will have to wait for a while in my stash of bits and pieces. What shall I put on it? An urn perhaps, or a sundial? I am not sure yet. We'll see.

Huibrecht 


Friday, 7 May 2021

To get ahead on heads. An old saint a ram and a horse....and an easter egg...


Hello My friends, 

No this is not meant as a scene á la the Godfather where one wakes up with a marble horsehead in ones bed. Nor is it about the remains of a butchered nativity scene. Nothing of the sort, my friends. 

Last year I bought two silver candlesticks with fishes made by Stephan Wein. (I did not by the shell tazza between them) 
He exhibits at the Kensington/Londen dollhouse festival and has a shop on Etsy. He is a goldsmith by trade who also makes miniatures. His miniatures are not run of the mill items and quite gorgeous. The prettiest of those are things you have to save up for, unfortunately, but they are worth it. And this year I allowed myself to buy one more of them. 

As you may know a private catholic chapel will be added to Huis ter Swinnendael. Every chapel needs some silverware for the altar et cetera? One or two reliquary's and saint's statues would also not go amiss. But that is easier said than done. 

I had my eye on this old carved and painted ivory head of a bearded man on a base of silver and ebony. It was described as a saint's head and looks the part. However In my eye it missed something. I asked Stephan if it was possible to add a kind of halo to it. He agreed and made sketches of two different kinds of halo's. We agreed one of them and Stephan added the halo to the statue.

The result is stunning in my opinion. I first wanted a golden halo but Stephan advised me to choose silver because that would fit better with the existing statue. And seeing the result I can say that in my opinion he is absolutely right. I love the result! But which saint does it represent? Noone knows. So I am free to choose some obscure local saint.

The Ram's head and the Roman horse's head are made by Karl Blindheim. He lives in Canada and makes beautiful miniature sculptures. Mostly of animals but also plants and human forms. 

I saw these pieces on facebook and asked if these two heads were (still) for sale. They were and the price was luckily just within budget. Apart from being two stunning pieces, the charm for me lies in the fact that these are heads of animals. Several busts of humans, made of clay, metal, plaster and resin are for sale. But animal heads are quite rare. And now I've got two of them for the small but growing collection of antiquities of sir Zonneschut. 
The last item has nothing to do with heads, but I will show it anyway.  It is a mini Fabergé egg made by Sun from Nalladris. The photo above shows the original Rose trellis egg, made by Fabergé and given by tsar Nicolas II to his wife for easter in 1907.

Wait, what? A 1907 egg in a 1805 setting? Yes you are right. You are absolutely right. It is an anachronism and does not fit in the period of Huis ter Swinnendael...

However that may be, I love these eggs. Sun has a few eggs made in miniature, and I intend to collect all the ones that I love. One per year, for easter. And although I strive to make the house and collection both fit into the style and period chosen, it is not intended as a period museum and one or two anachronisms should not spoil the overall effect. 😁 And it helps that a lot of Fabergé eggs were inspired by older styles and periods. So it fits somewhat, kinda, a bit, enough... 

Unfortunately, due to a delay in the postal service the egg did not arrive until after easter. But I am not less happy to add it to my collection.

I hope that you will like my new treasures too. 

Huibrecht 

Monday, 7 December 2020

A (terracotta) bust is a must

Hello my friends, welcome back. The last few years I have bought several kits and miniatures that only need to be finished. Looking at all those items to make or to finish there should be something that could be done while "in between miniatures". Then I saw the two busts I bought from Alison Davies last year.


A Roman emperor and a lady. Quite popular models by Alison Davies, cast in white resin. Often you see these finished as aged sandstone or marble. Beautiful, but I wanted something different, but what? Busts come in all kinds of materials besidse stone or marble. Just think of wood, (blackened) bronze, lead, pewter, (glazed) terracotta, painted porcelain, et cetera. You name it!


So  I wanted to try something new. A painted terracotta finish. Terracotta was used by artists for studies before the attempted cutting the bust in marble. It was also used for making copies.  For those who can work with clay it is a wonderfull material that can be teased into almost any shape or form.

There are probably very good articles and tutorials on creating a faux terracotta finish. But I could not find one. So I had to think up a method myself. Terracotta is not rjustone colour. but a range of different colour (tones and hues) Depending on the type of clay used the natural colour of the real material goes from soft grey to pink and from sandy yellows to a beige with a burgundy hue. That natural variety gives quite a lot of freedom. After I found pictures of good examples I tried to recreate their colour.


First I aplied an undiluted layer of acrylic paint called terra. As you can see for yourself, this looks way to orange! As if it came from a factory where they make brand new terracotta sewer pipes. yikes! I had expected this because this is meant as the basecoat to shine through the next layers. And so, after it had dried, I applied a second layer of pinkish beige. Something close to a light skin tone. 


The result looked quite promising colour wise. much better than the basecoat Unfortunately this colour did not come in matte finish. As you can see on the picture above it is way to shiny! It almost looks like it is glazed! Not good! I apllied a matte varnish but that dit not tone down the sheen in any way. So varnish was not going to help me with this.  


So what now? In a local store I found (vallejo) pigment powders used on miniature (train) diorama's and such. typically for ageing and such. This could help. I aplied a thin layer of medium and a dusting of the powder. When the medium dried I rubbed the bust with a soft cloth. I ended up with this as a result. Quite dark but it has that subdued sheen that (older) terracotta often has. 


The darkness in the last picture was replaced with a lighter result after it had fully dried (took quite some time) The end result can be seen on the picture above. I am very happy with the result. 

I also painted 2 1:24 vases. I followed the same steps but omitted the first step of painting them in terra like the bust. So the skintone paint was added directly on the resin vases. Because of poor light (it is a rainy day) it is a bit hard to see compared now, but their terracotta colour is actualy a bit paler and more yellow than the bust. Just like with gilding, the base colour affects the final outcome of the colour. 

I have enjoyed this little trial and error. The result is even better as I had hoped. I had expected to need to use more layers of paint to achieve this effect. And who knows some of you may benefit from it someday. :-)

Huibrecht 


Thursday, 16 April 2020

A visit to Het Poppenhuis (Arnhem)

Hello my friends,

I have been painting and gluing in order to build up the first wall sections for the first rooms. I will show you the progress on that next week, when there is really  something to show.

A few months ago I had to go to Arnhem for my work. A good friend of mine works in the same field as I do and we had agreed to meet and catch up prior to the meeting. Unfortunately we had to reschedule that cup of tea, so what was I to do with my morning?  I had a visit to the 'Het poppenhuis' in Arnhem on my miniature wishlist so It may have been fate, or just a coincidence, but I made an impromptue visit to the shop that morning.

Rika gave me a warm welcome and we drank a cup of tea while talking about this hobby we share. What I did not know, was that attached to the shop, was the office of DHN magazine. Naturaly I did not decline the invitation to visit the office and the studio where the pictures for the magazine are made.

After looking at Rika's private collection it was time to go to the shop. She mainly sells hand made miniatures. So there was a lot of great stuff to see. Since my time was limited, I still had to attend the meeting in the afternoon, I had to linger less and focus more. :-)


It is often difficult to choose, but choose we must. Every coin can only be spent once. I bought these two  hand painted vases. one can never have enough porcelain in my mind :-0 Next to it are four apothecary bottles and two tinware candlesticks.

I also bought this painted plate. Within the garland you see an orange tree and the text "Vivat Oranie" It is old Dutch spelling for "Long live Orange" from the 80 year war into the revolutionary period at the end of the 18th century the Princess Van Oranje Nassau were Stadhouder and held the highest (military) office in the republic. They were Princess but did not rule as kings. The faction in society that thought that the House of Orange should rule the Dutch Republic or at least hold the highest office, liked to show their political stance. Crockery and porcelain was one way to show this allegiance. Originaly it was meant as a show of gratitude, the House of Orange led us in the 80 year war to free us from the spanish crown and the opression of protestants. In the revolutionary periode at the end of the 18th century, having this kind of earthenware almost amounted to an act of defiance or treason. In 1795 the revutionary patriots had driven out Stadhouder William V, who fled to England. Therefore this plate needs a place, albeit an inconspicuous one, in Huis ter Swinnendael.


But there is more. I loved this baroque bust of a whig wearing gentleman in quasi Roman armour.  Is he a member of the Zonneschut family? Who knows, nothing decided on that yet, but he will get a place in the house. And then there are a set of 6 glasses and 2 glass goblets in the manner of the 17th century. All made by Gerdt Felka. I really love them. And since I will set the house in summer there was no reason not to pick these charming roses. You can almost smell them, don't you?


Lastly I bought these lovely two items. A stool and a tray. Both painted in a lovely way. It was the decoration that did me in. Especially the little stool. I love the light blue base with the rust and cream coloured decoration. I will try to imitate that colourscheme for the washing attic. That is where this stool will eventually end up. The serving tray is quite pretty. It can really end up anywhere in the house. I'll find an apropriate place for that tray.

Well, that is it for now. I hope you have enjoyed this little post and till next time!

Huibrecht