Hello my friends,
Usually I post around 2 items per month. But not last may. It was a very busy month with little time for miniatures. But I did manage to visit a grand house for miniature inspiration. A very grand house indeed. Because we may call this house a palace.
On a sunny and delightful day, late in may, I went to visit 'Paleis het Loo' near the city of Apeldoorn. In dutch the word "loo" has nothing whatsoever to do with a water closet or indoor plumbing. No, it means an open space, or clearing in a wooded area.
In the 17th century the countryside in this part of the Netherlands was largely wild and uncultivated. Mainly moors, heather and woodland with an abbundance of game. When William and Mary (before they succeeded to the English throne) built a hunting lodge here, to escape the summers in The Hague, the original house only consisted of the higher central part with the flagpole on top. Soon it was extended with the two paired pavilions on either side. The lower wings on either side of the open front court housed the stables, kitchens and such.
It was never built as a royal summer palace, but with the elevation to king and queen of Great Brittain it became as such. However, after the elevation they hardly spent time in the netherlands anymore. So William directed his attention to (re)building palaces in England.
Hampton Court is for example the best example of their plans that were (partly) executed. (partly because in the initial plans for Hampton Court all they Tudor wings would have been demolished to make way for the new palace Wren had designed for William & Mary.
But back to 'Het Loo'. The palace as we see it today, including the gardens is as true to the palace as possible as it would have been when William & Mary last saw it. Practically all later additions and extensions in the 19th and early 20th century have been demolished or removed.
If we were to visit the palace in 1914 for example, you would see an extra floor added on the central part (the corps de logies) and on all the pavilions. All the external walls would have been plastered white, and a large wing with grand reception rooms and (guest) appartments were built on top of the former private garden of Mary. The baroque gardens had been destroyed and replaced by a landscape garden in the English style.
The visitor in 1914 would hardly recognise what he sees today as being the same palace. All those later alterations have been removed and turned back to the 17th century state as far as that was possible. The only 19th and early 20th century additions that remain are the royal interiors appartments in the west wing.
In the east wing and the 'corps the logies' (the original central building) most interiors are restored back to their 17th century appearance. One of these beautiful rooms is the old diningroom you see above an below. In this palace they use the terms "old" and "new" according the functions of rooms before or after the paired pavilions were added to enlarge the palace. So before the additions this was the dining room. Later it became the ante chamber to the new diningroom.
One of the details they have brought back are these doors with the tapestry pulled away. After the original restauration in the 1980's this door was hidden from view by the tapisties. Now it has returned to show how the room was used. While dining the door would not be used and the tapestry would hung as a curtain to obscure the door from view. With the latest restauration they brought this original feature back in view.

And where there is an old diningroom there is also a new diningroom. And here it is. Bigger than the old one. The collumns and the balustrade (partially removed for the walkway for visitors) divided the area where William & Mary and their guests dined, from the 'gallery' where the dishes would be served from and where the (marble) wine coolers stood. The trompe l'oeil vases on the back wall are actualy doors behind which cutlery and tableware to lay the tables with were stored. The door in the back, where the lady dressed in white is standing, opens up to the corridors that eventualy leads to the kitchens where all the food was prepared.

And when you think of a palace, you think of a picture gallery or a long gallery. This is said gallery in Paleis het Loo. Not nearly as large as it's counterpart in Hampton Court, but that was built as a royal palace, and this house was only 'elevated' to that role after it was built. And to stay on the subject of food.... This gallery was used as a diningroom too when the number of dinner guests would 'royally' exceed the capacity of the new diningroom. :-)
Speaking of old and new. This room above is the new bedroom of princess Mary or the Queen Mary bedroom. You have guessed it by now. This room lies in one of the 17th century extensions and the 'old' bedroom when she stil was 'merely' a princess was situated in the original building, the corps the logies. Exactly! We'll get to that room later.
Unfortunately I forgot to take picture of the room in its entirety so I can only show you this corner of the room. This room shows an extraordinarily beautiful two poster bed, or a 'lit d'ange' as the french call it, the floating canopy looks as if it is held up by invisible angels...
One room that has considerably changed since the last restauration is this salon in Mary's appartment. The white plaster ceiling you see here is an 18th century addition that was left untouched. But the rest of this room has changed considerably. The picture below shows you how the same room has looked since the previous restauration in the 1980's.
Apart from the ceiling the rest of the room is restored to its 17th century splendour, including the loosely draped bright red wall hangings. The stretched panels we are acustomed to (like the blue and gold in the picture from internet above) only started to appear in the 18th century when these became permanent fixtures of rooms.
Hoi Up and until the time of William and Mary the cloth wall hangings were only attached at the top of the wall. Easy to take down again when the princely (and later royal) couple and their court left again after the season to reside in another palace. In the 17th century these fabrics were still too rare and expensive to leave behind. And so these were taken off the wall and taken with them each time the court moved to another residence.
And here is Mary's 'old' bedroom. I love the painted ceiling very much. It is painted as a tromp l'oeul. Suggesting that you look through the open ceiling into a suggested space above. You can see beyond the oval balustrade into a domed space above. Very grand. The top pieces here are the set of a table and mirror flanked by two gueridons. In the Dutch Republic of the second half of the 17th century a set like this was thé thing to have in a main room. The epiphany of fashion and refinement.
The next room I want to show you is the large reception room. Here the prince greeted important visitors and ambassadors during the day and receptions and dances were held here. Mind you. Not bad for a building that was only meant as a summer retreat to go hunting...
Interior decorating being the slave of symmetry in that period, the windows on the courtyard side are 'mirrored' with windows filled with mirror glass.
Can you imagine a group of people in court dress dancing the night away with the light of candles being reflected in the mirrors and gilt surfaces? I can...
These small rooms in the pictures above and below are some of the private cabinets in the palace. Cabinet here means a small, private room, where only a select group of friends, family and servants were allowed to enter. And in some cases noone without the express invitation of the owner. The dressingroom (although that room is a bit too big to be a proper dutch cabinet room) and the wig room are meant as such private little rooms.
There is a lot more to see here than the rooms I've showed you. But I have limited myself to some of the rooms that have been restored to their 17th century look. For now I ignored the sumptious late 19th century interiors in the opposite wing where king William III and later his daughter queen Wilhelmina lived during the 2nd half of the 19th century in the summer months. Great rooms but not interesting for Huis ter Swinnendael.
The immense restauration operation of the last 5 years does mean that quite a few changes/additions from the 18th and early 19th century have disappeared in order to reveal or bring back 17th century remnants. A pity on one hand. But stil a spectacular museum.
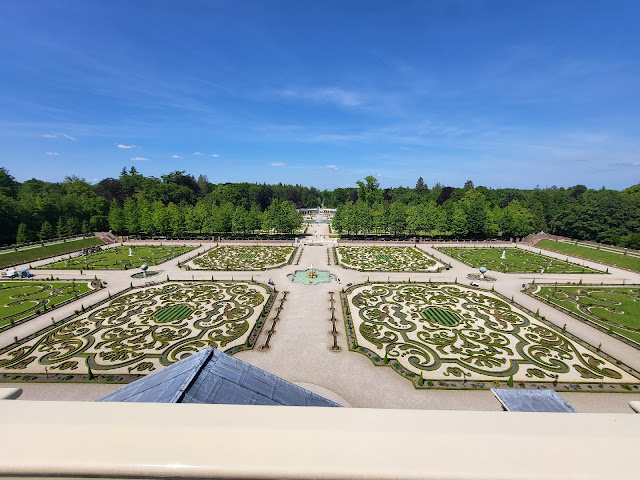
After the palace it was time for the gardens. Here you can see some of them from the roof terrace on top of the central corps de logis. This may feel like a modern addition but the terrace is actualy an original feature of the palace from the start.
Here Queen Mary and her ladies in waiting would sit in the shade of a canopy on hot summer days. From here they would have view on her husband and his friends galopping in the woods outside the palace garden on their many hunts.
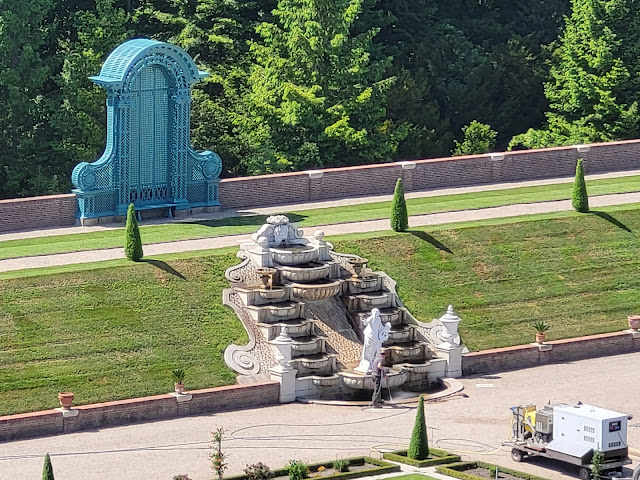
Speaking of her, if she did not wish to go to the public portion of the gardens she could withdraw to her private garden. This you can see in the picture above. Her privste parterre and on the far right you see a part of the berceau. The covered walkway where the ladies could walk without the risk of losing their pale aristocratic teint.
And with these last to pictures I'll leave you on your own in this garden. After the Batavian revolution the high maintanance baroque garden was turned into a romantic landscape garden. For the first restauration in the 1980's they had to dig out the filled in lower garden. They were astonished when they found most of the statues, fountain heads and ornamental vases, long lost, buried there and with only minor damages. So most of the statues and fountains here are original. The rest recreated acording to the plans and drawings found in the archives.
P.S. this is going to be quite a royal summer for me by the way. In july and august I have been given the chance of visiting the 'Paleis op de Dam' in Amsterdam and 'Paleis Noordeinde' in The Hague.
Contrary to 'Paleis het Loo' these palaces are stil in use by the royal family. Normaly they are not open to the public. But since a few years a select number of tickets are available in the summer months. They are often sold out quickly. But this year I was lucky with both palaces. Of course I will share the pictures of those visits with you all.
Be well!
Huibrecht